

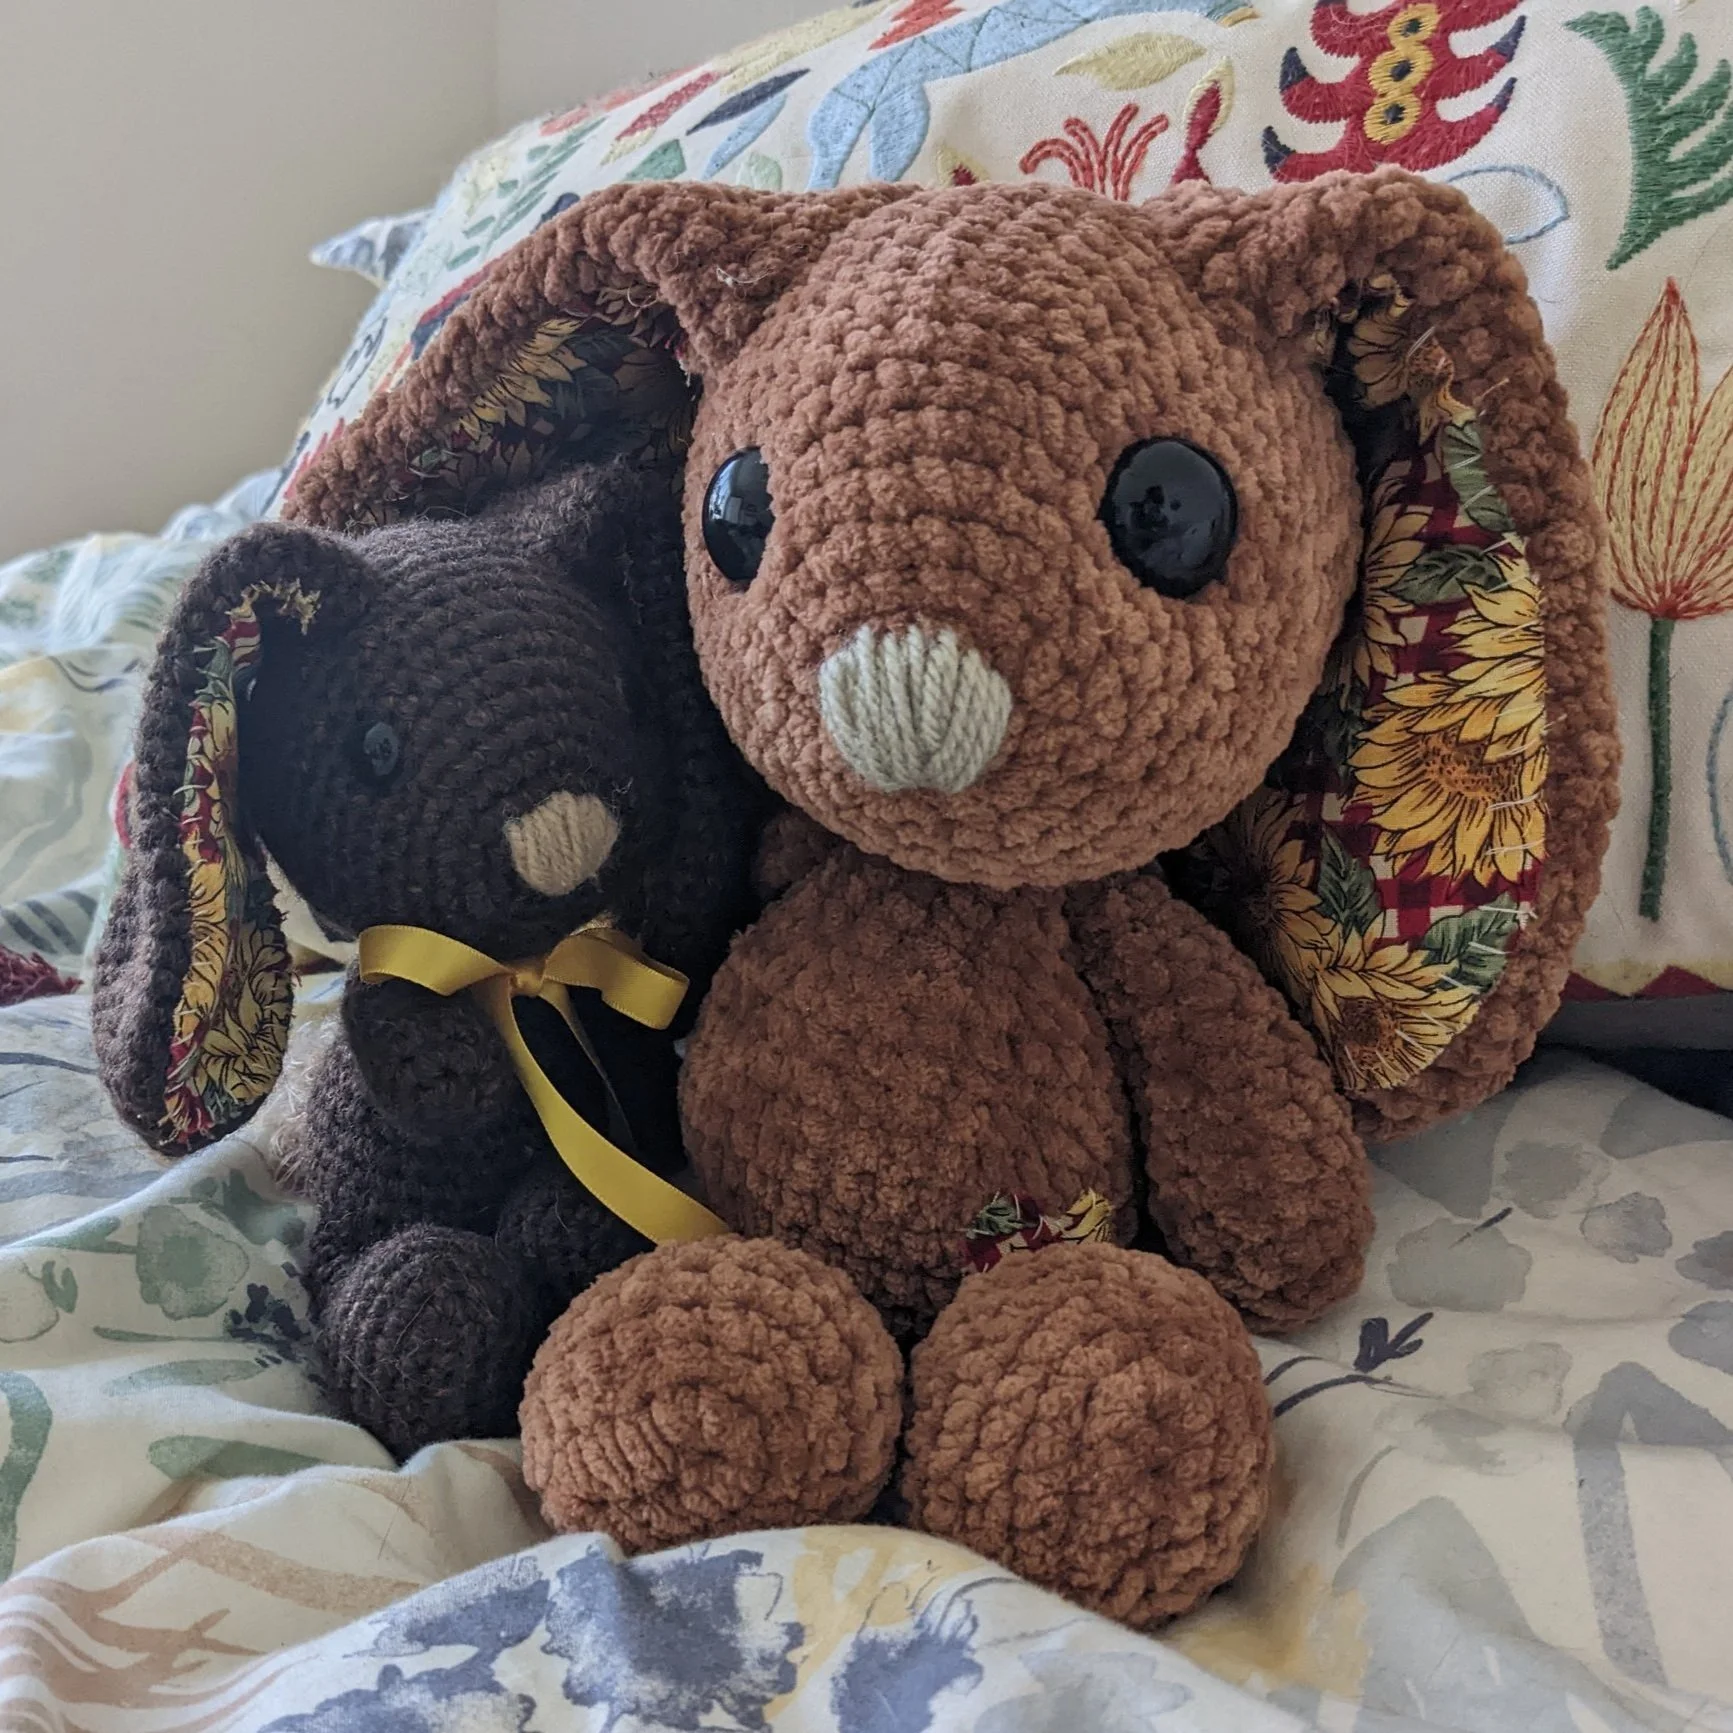
Because kids of all ages could do with a bunny.
Beatrice the Floppy Eared Bunny Rabbit Crochet Pattern
Before you start:
This pattern is completely written however is waiting on pictures of the step-by-step process, if you have any problems with the pattern please reach out and let me know and I’ll prioritise getting that step photographed!
While this bunny is generally made with chenille / velvet yarn and a larger hook, you can make this using standard acrylic yarn as well and a smaller hook.
I personally use approximately 1 and 1/4 balls of the Hobbii Honey Bunny or Himalaya dolphin baby for this bunny, if you’re using yarn-under at all you may be able to get away with just one.
The smaller bunny is made with 8ply acrylic yarn; I personally use the Marvel brand from Spotlight stores in Australia
The larger soft bunny is made with Himalaya dolphin, and a 4.5mm hook.
A good alternative is Hobbii’s Honey Bunny yarn
Safety eyes are not suitable for small children as they may pose a choking hazard, if finished product is intended for a child please do not use safety eyes here and use one of the following insted:
Using 100% Mercerised cotton in 4ply & a 1.5mm hook (a 2 - 2.5mm hook will be fine here too depending on personal preference)
Crochet 8 HDC into a Magic Ring
Crochet 2 HDC into each stitch around (16 stitches)
You can use either SC or DC for either row depending on how big you want the eyes to be. I personally like to then loop some white through some stitches to make highlights, but this is personal preference.
Felt and/or felting on eyes using a felting tool
The indent on the eyes is created by looping scrap acyrlic yarn around them and pulling inwards, this step will be detailed below but is entirely optional.
A Glossary of Terms:
Pattern is written in US Terminology unless otherwise specified
Ch —> Chain
Slst —> Slip stitch
SC —> Single Crochet
DC —> Double Crochet
HDC —> Half-double Crochet
TC —> Triple Crochet
INC —> Increase (Work 2 stitches into the same stitch to add one to the overall count)
DEC —> Decrease (crochet two stitches together to remove one fro the overall count)
MR —> Magic Ring (Work stitches into a tight circle)
This pattern is worked in the round, this means please don’t slip stitch at the end of the row to join, continue on in a spiral.
I generally will make all of the pieces and pin them in place before I attach anything, this is the best way for me personally to ensure I attach evenly and as symmetrically as I can.


** The acrylic bunny’s are jointed - I don’t have a guide on how to accomplish this yet, but if you want a hand finding a guide please reach out and I’ll help find you one. Note that if you’re using Chenille yarn to make the bunny, I would not reccoment jointing with it, a much more stable joint would be using a close coloured acrylic to actually joint the piece.
You will need:
4.5 mm crochet hook
Yarn needle
Himalaya dolphin baby - 1 - 1.5balls in the primry colour
Scrap fabric for the ears
Eyelash / fluffy yarn for the tail (optional)
Scrap acrylic / cotton for the nose
15 - 18 mm safety eyes

Head
Worked front to back
Attach the eyes in between rows 8 and 9 before closing off, approx 11-12 stitches apart.
Do I look familiar? This pattern uses similar feet / arms / body structure to the dinosaurs.
Be careful if you’re used to doing the dinos, the bunny has a longer head.
|
Row |
Instructions |
Final Stitch Count |
|
1 |
SC 6 in a Magic Ring |
(6) |
|
2 |
INC In each stitch around |
(12) |
|
3 |
(SC 1, INC) x 6 |
(18) |
|
4 |
(SC 1, INC, SC 1) x 6 |
(24) |
|
5 |
(SC 3, INC) x 6 |
(30) |
|
6 |
SC in each stitch around |
(30) |
|
7 |
(SC 2, INC, SC 2) x 6 |
(36) |
|
8 |
SC in each stitch around |
(36) |
|
9 |
(SC 5, INC) x 6 |
(42) |
|
10 - 13 |
SC in each stitch around |
(42) |
|
14 |
(SC 3, INC, SC 3) x 6 |
(48) |
|
15 – 16 |
SC in each stitch around |
(48) |
|
17 |
(SC 3, DEC, SC 3) x 6 |
(42) |
|
18 |
SC in each stitch around |
(42) |
|
19 |
(SC 5, DEC) x 6 |
(36) |
|
20 |
SC in each stitch around |
(36) |
|
21 |
(SC 2, DEC, SC 2) x 6 |
(30) |
|
22 |
(SC 3, DEC) x 6 |
(24) |
|
23 |
(SC 1, DEC, SC 1) x 6 |
(18) |
|
24 |
(SC 1, DEC) x 6 |
(12) |
|
25 |
DEC Around and close off |
(6) |

Indenting the Eyes
On your finished head piece, take another long piece of yarn - if you used the himalaya dolphin baby yarn, ideally you want to use an acrylic yarn in a similar colour for this, the himalaya may snap if you use it. Colour match is not important, if you don’t have a close one use whatever you’d like for this - the himalaya brown rabbit I used pumpkin coloured thread, there’s an image down the bottom of the section, you shouldn’t be able to see the thread at all when you’re done.
Attach thread to your yarn needle and pass the yarn through the stitch closest to the eye on the inside bottom corner, through to the opposite eyes bottom inside corner.
Pull thread through until you have even tails on either side

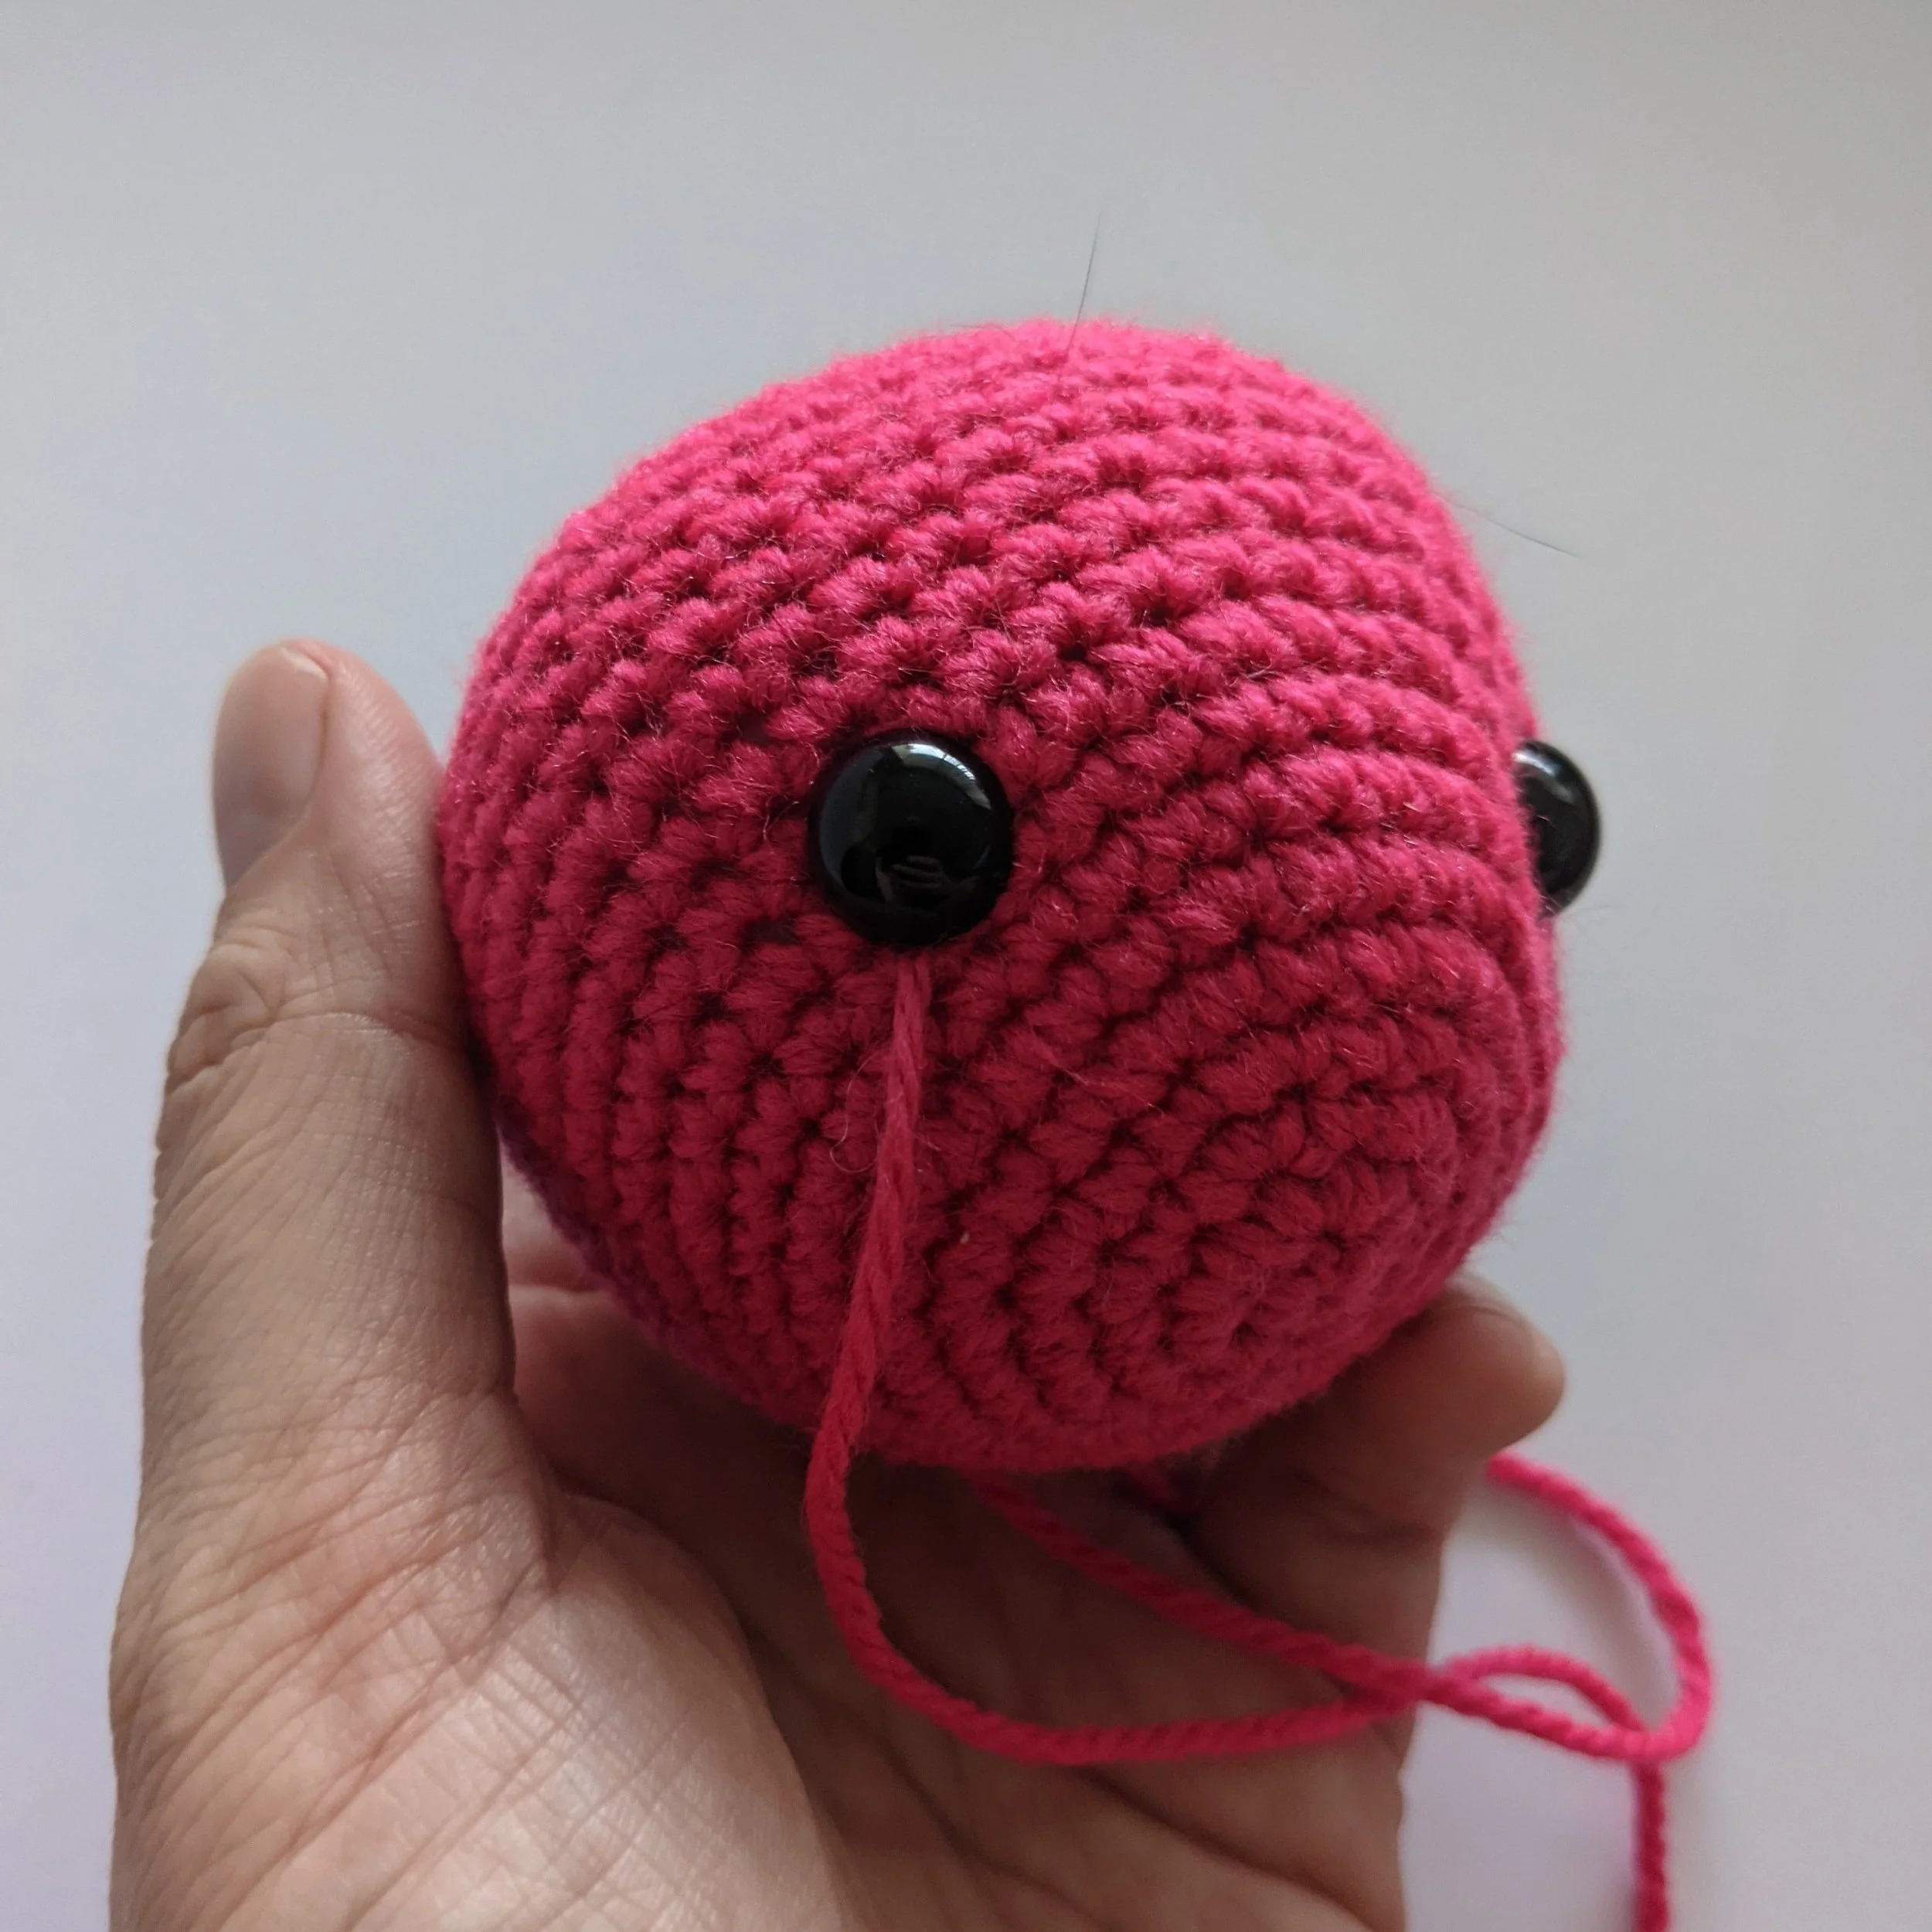
4. Make a loop with the tail and loop around the eye twice, pull loop tight so you cannot see the loop anymore on the eye and have the tail back where it started in the bottom inside corner - do this on both eyes.
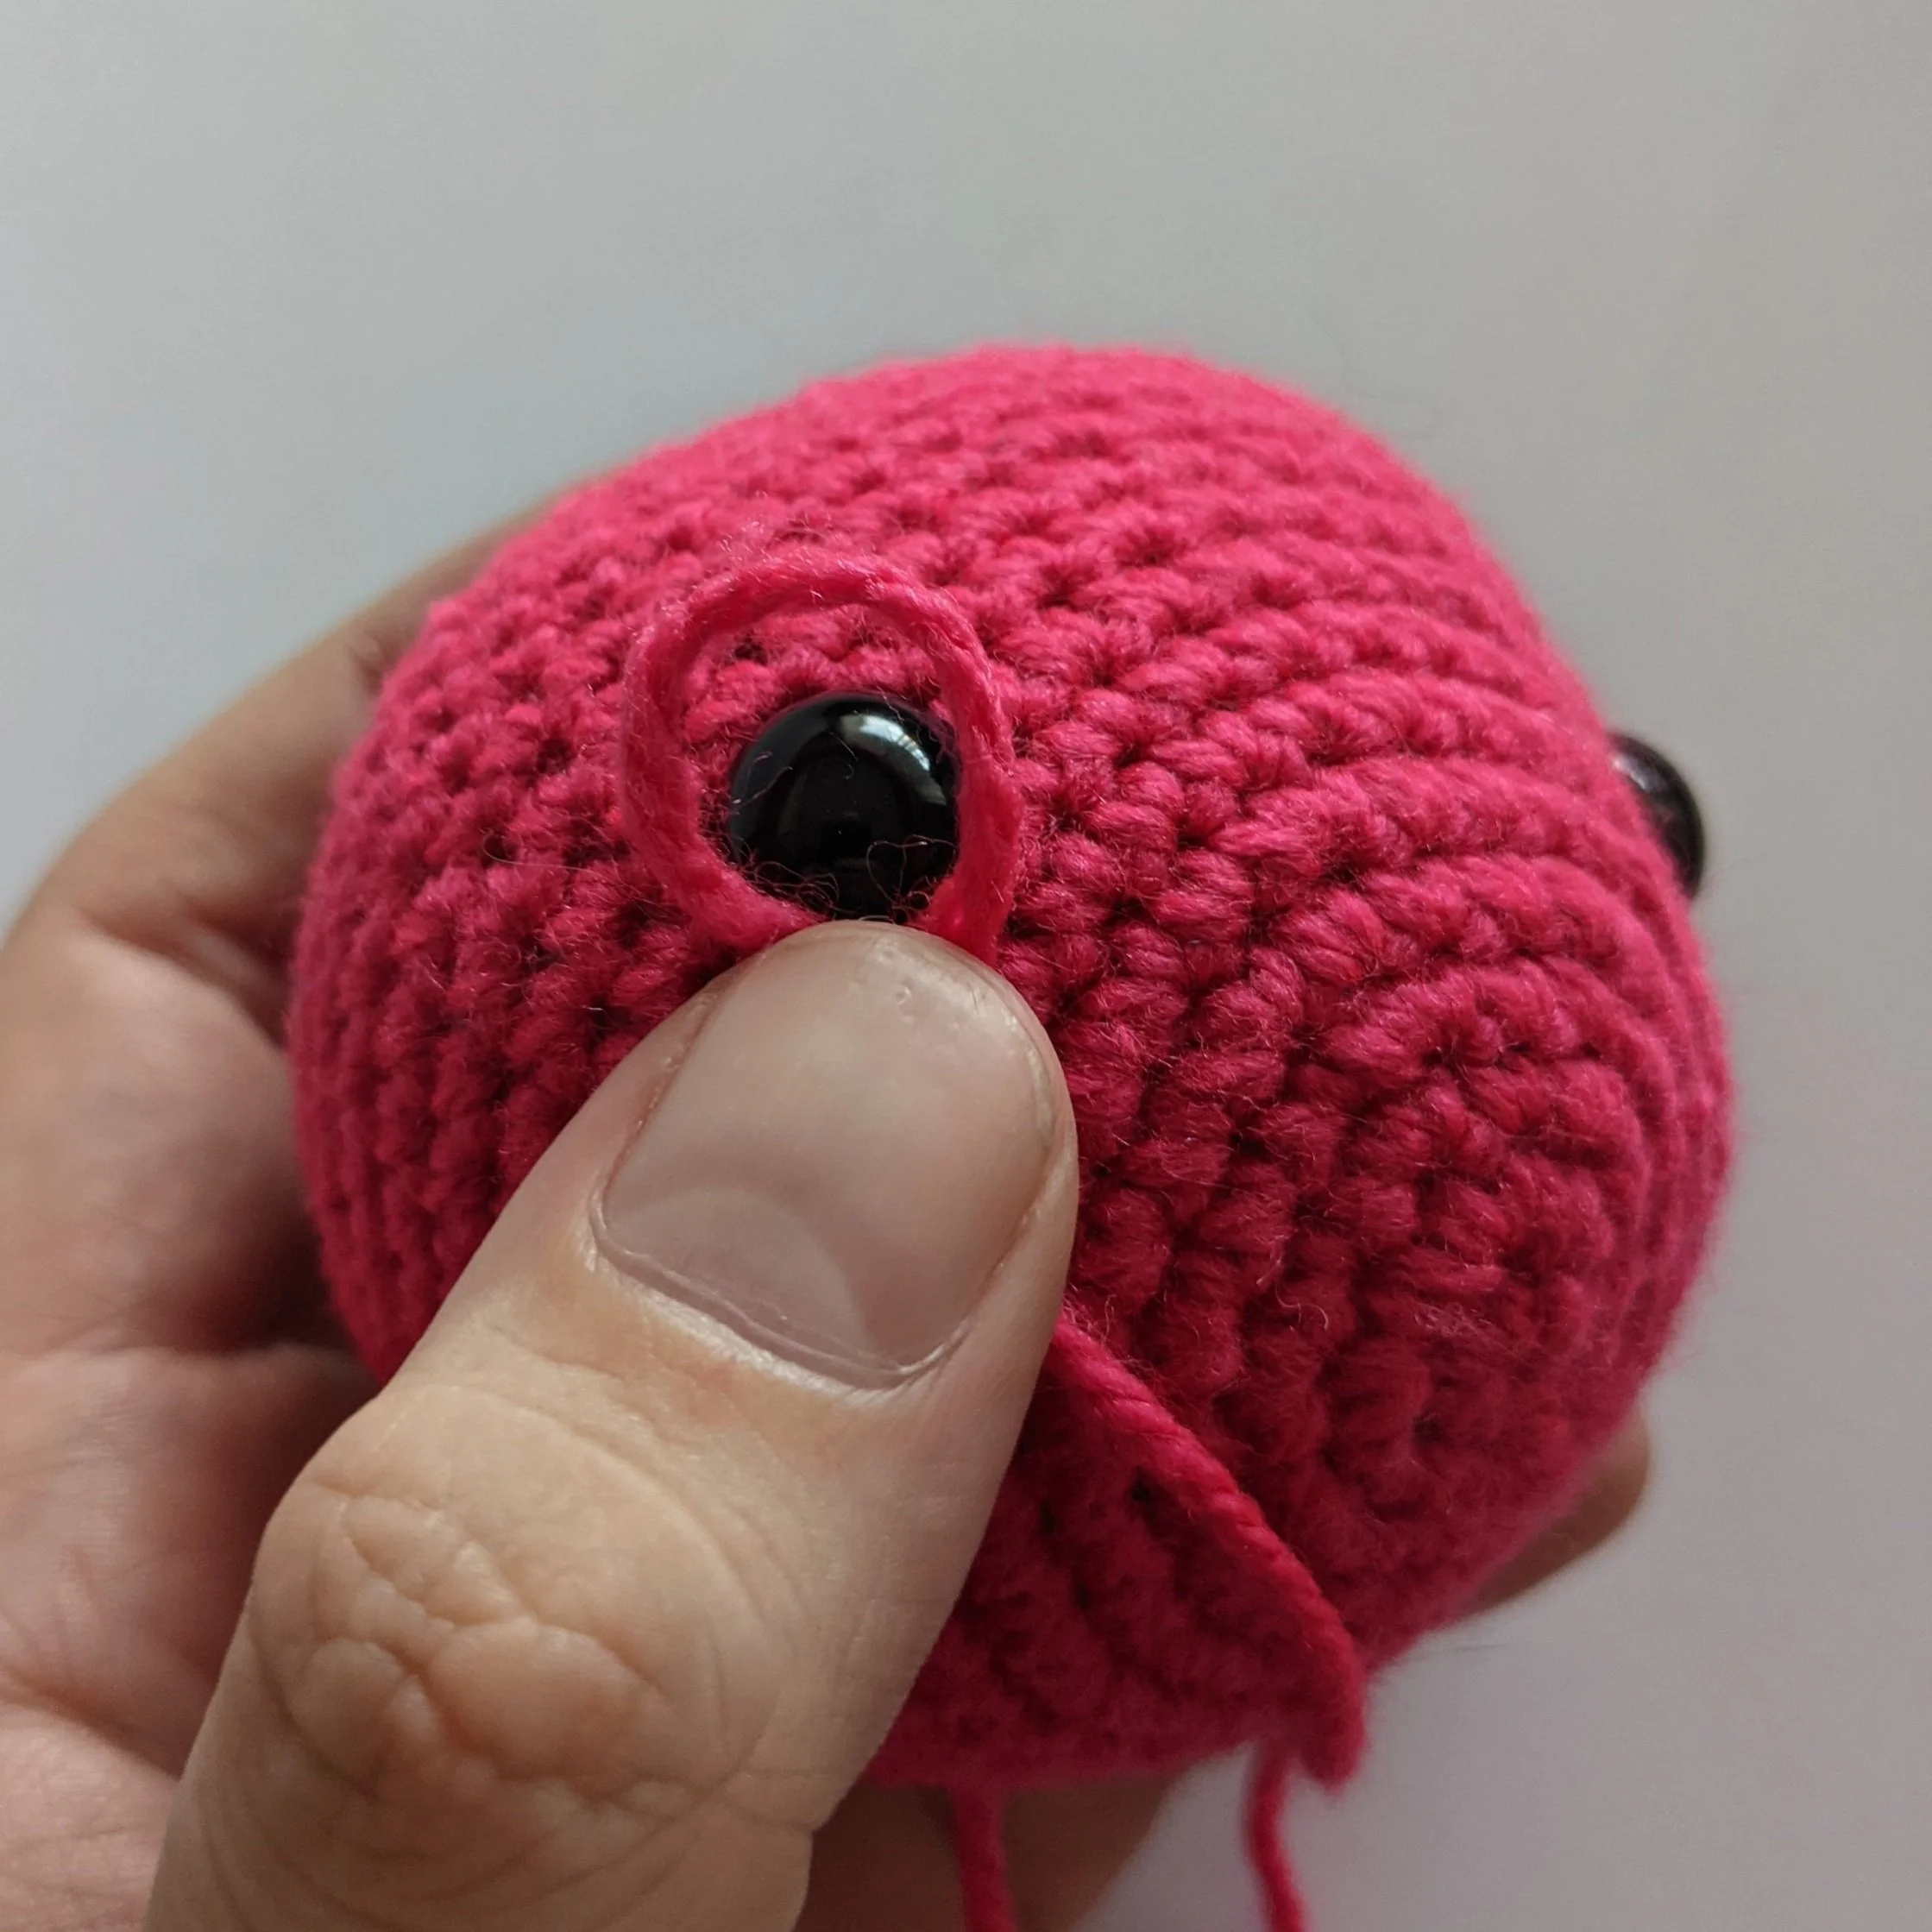

7. Take the two tails, and pull them tightly until the eyes are indented to where you want them.
8. Knot the ends over at least one stitch to anchor them in place, ensure you don’t use a granny knot here or it will slowly slip out.
9. Leave the tails free, you can stuff them into the body when it’s completed and attached, you may want to weave the ends into some of the stitches on the bottom of the head that will be covered by the body if this toy is expected to be thrown around a fair bit to secure them a little more.


5. Pass thread now back through the stitch closest to the bottom inside of the eye, but this time draw the thread down to the bottom center of the head piece - this part of the head will be covered by the body.
6. Ensure when you do the other eye you pass the thread through to the adjacent stitch, you will need the tails in different close stitches to each other to anchor them, otherwise when you pull the threads they won’t stay where you pull.

Body
|
Row |
Instructions |
Final Stitch Count |
|
1 |
SC 6 into a Magic Ring |
(6) |
|
2 |
INC in each stitch around |
(12) |
|
3 |
(SC 1, INC) x 6 |
(18) |
|
4 |
(SC 1, INC, SC 1) x 6 |
(24) |
|
5 |
(SC 3, INC) x 6 |
(30) |
|
6 |
(SC 2, INC, SC 2) x 6 |
(36) |
|
7 - 10 |
SC in each stitch around |
(36) |
|
11 |
(SC 2, DEC, SC 2) x 6 |
(30) |
|
12 |
(SC 4, DEC, SC 4) x 3 |
(27) |
|
13 |
SC in each stitch around |
(27) |
|
14 |
(SC 7, DEC) x 3 |
(24) |
|
15 |
(SC 1, DEC, SC 1) x 6 |
(18) |
|
16 - 19 |
SC in each stitch around |
(18) |
|
Leave body open ended to attach to head |
Ears
|
Row |
Instructions |
Final Stitch Count |
|
1 |
SC 6 into a Magic Ring |
(6) |
|
2 |
INC in each stitch around |
(12) |
|
3 |
(SC 1, INC) x 6 |
(18) |
|
4 |
(SC 1, INC, SC 1) x 6 |
(24) |
|
5 |
(SC 3, INC) x 6 |
(30) |
|
6 – 7 |
SC in each stitch around |
(30) |
|
8 |
(SC 4, INC) x 6 |
(36) |
|
9 - 10 |
SC in each stitch around |
(36) |
|
11 |
(SC 8, DEC, SC 8) x 2 |
(34) |
|
12 |
(SC 15, DEC) x 2 |
(32) |
|
13 |
(SC 7, DEC, SC 7) x 2 |
(30) |
|
14 |
(SC 13, DEC) x 2 |
(28) |
|
15 - 29 |
SC in each stitch around |
(28) |
Do not stuff the ear, flatten to form the cupped ears.
Do not whip stitch ears shut, leave open ended - if you whip stitch them shut prior to attaching they will sit flatter against the rabbits head.
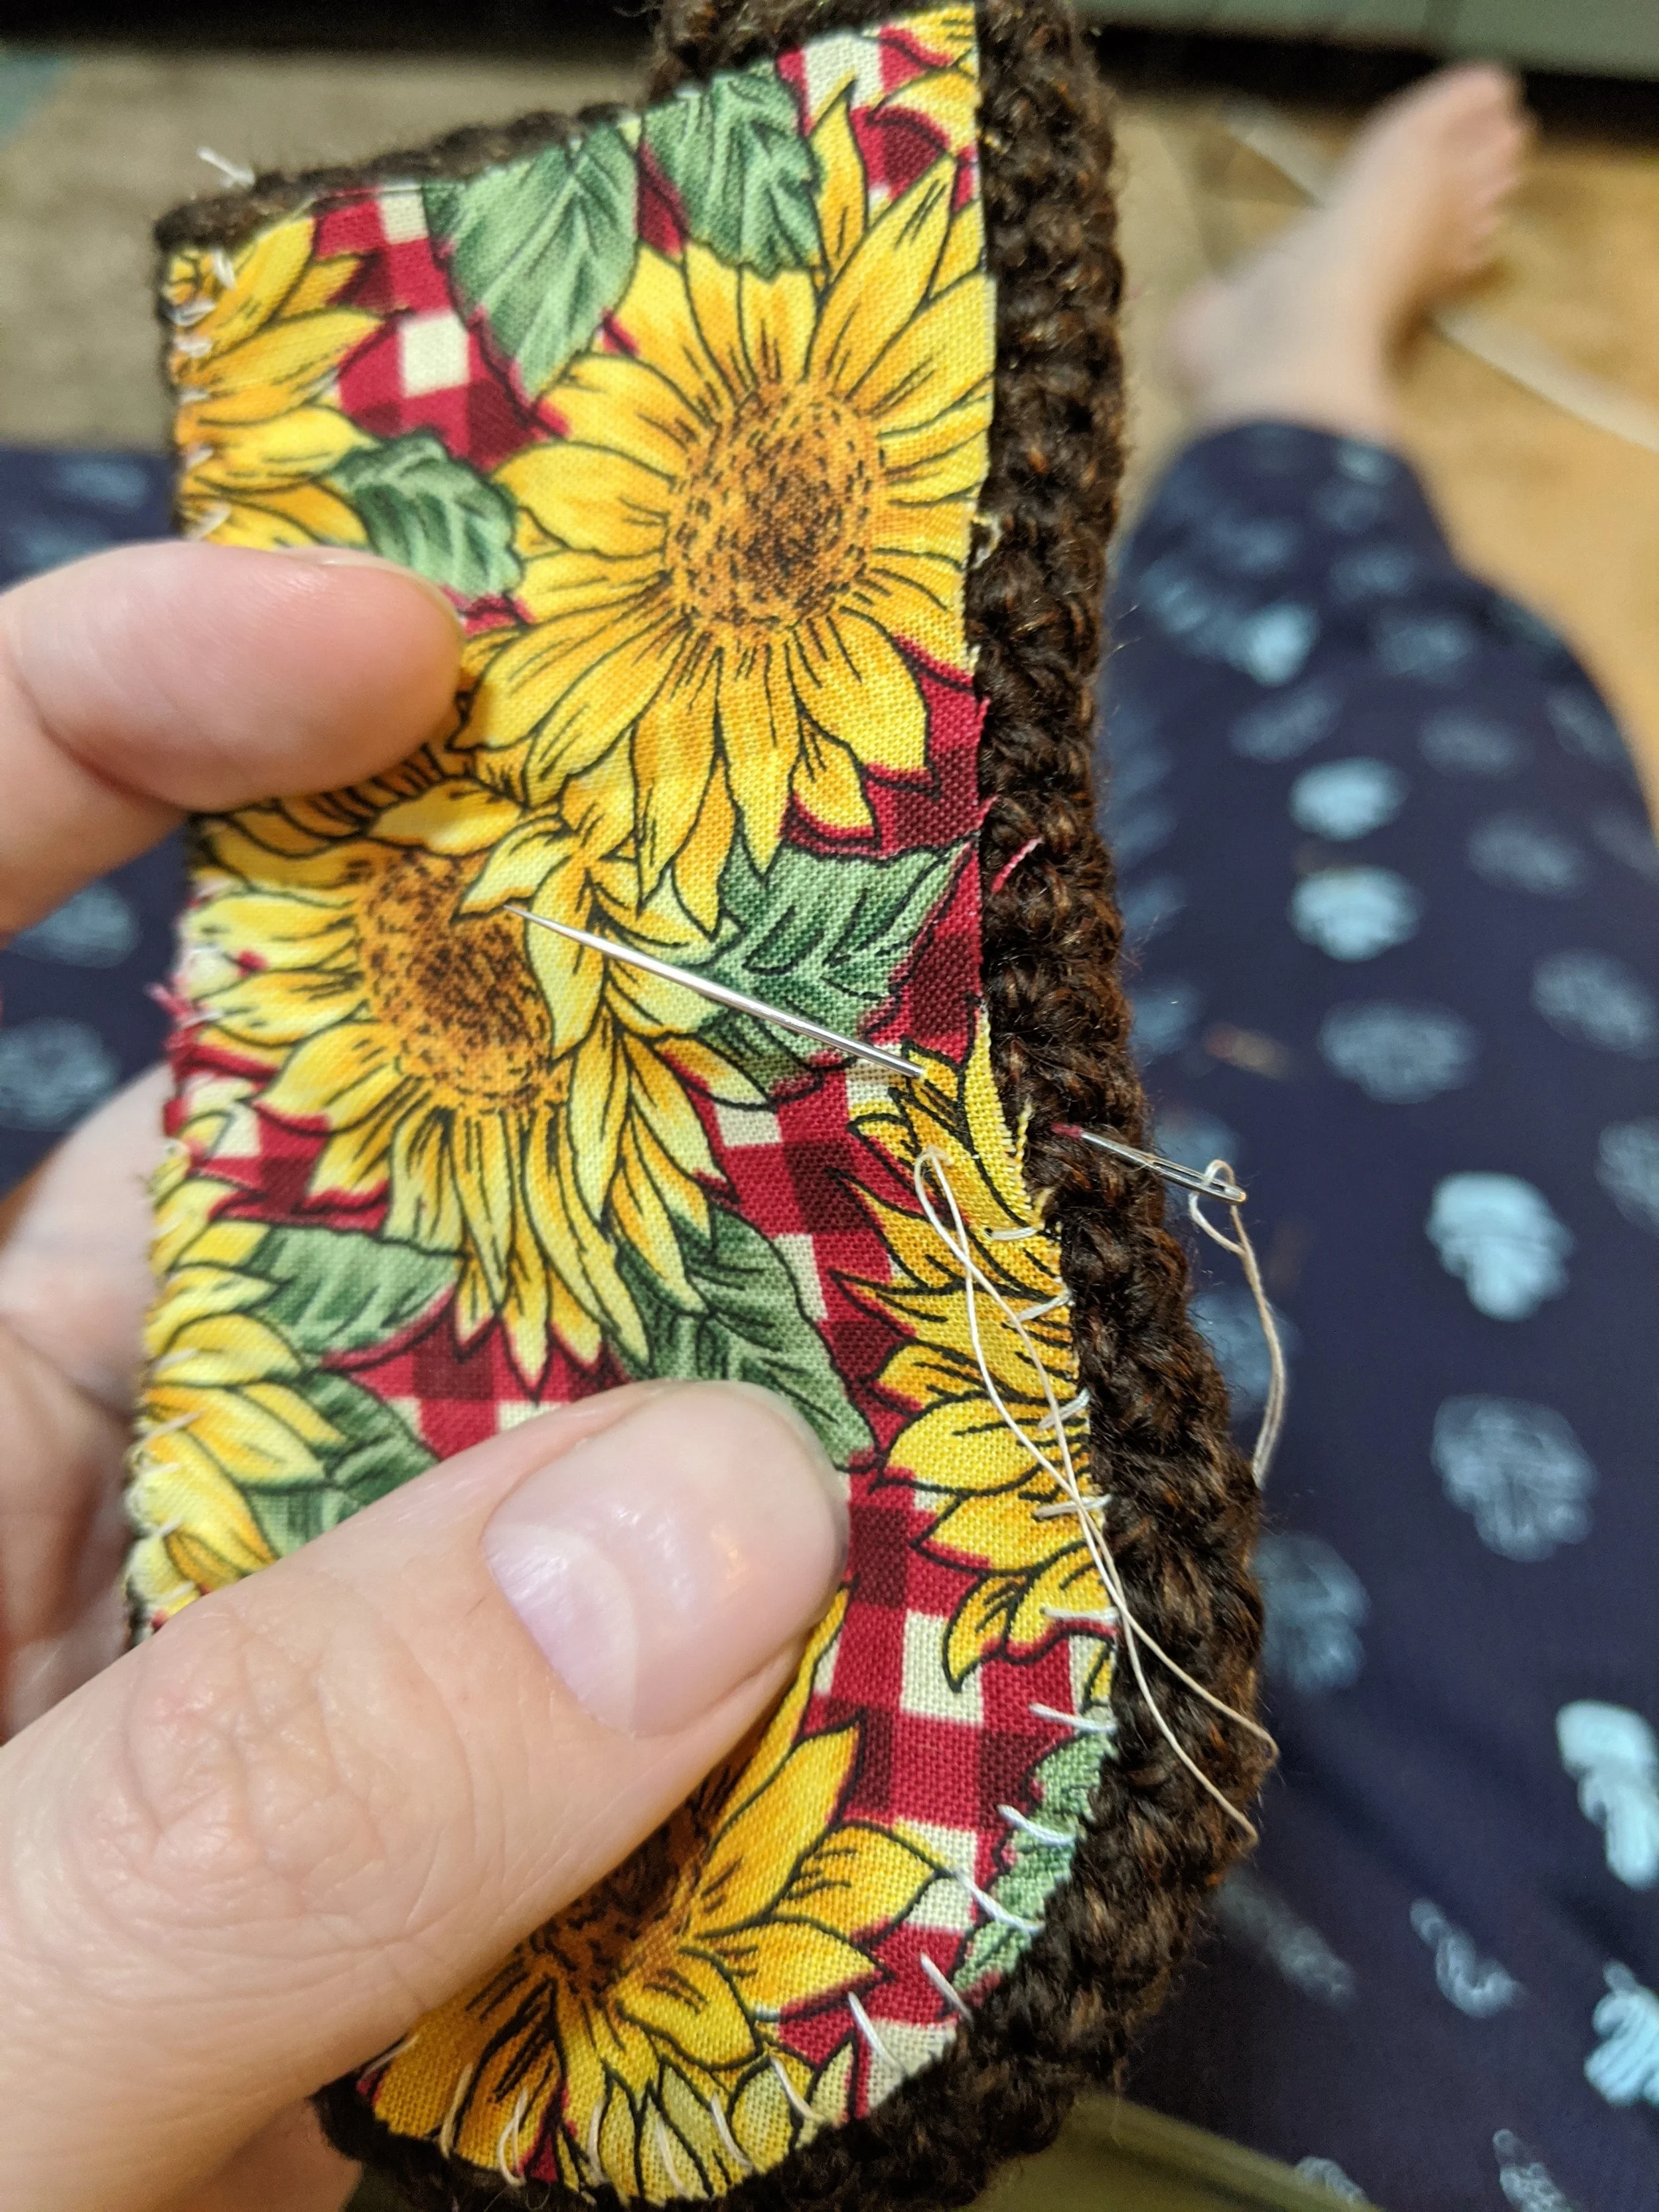
Lining the Ears (Optional)
Before you attach the ears to the head, take an ear piece and draw an outline on either scrap paper, or directly on your chosen fabric.
You want to cut your fabric lining a little smaller than the ears themselves, so cut at least a half centimeter inside the outline you’ve drawn
> The Larger soft bunny with the himalaya yarn I cut 1 cm inside the outlineOnce you’re happy with the size of your fabric, pin it to your ear piece and attach with cotton thread


Arms (Make 2)
|
Row |
Instructions |
Final Stitch Count |
|
1 |
SC 6 into a Magic Ring |
(6) |
|
2 |
INC in each stitch around |
(12) |
|
3 – 5 |
SC in each stitch around |
(12) |
|
6 |
DEC 2, SC 8 |
(10) |
|
7 - 13 |
SC in each stitch around |
(10) |
When attaching the arms, the decreases in row 6 should be facing the body - those decreases curve the arms just a little bit.
Stuff the arm only lightly, the later rows should remain relatively flat. Whip Stitch across the top to finish arms
Legs (Make 2)
|
Row |
Instructions |
Final Stitch Count |
|
1 |
Chain 5, 2SC in second chain from hook, SC1 in next 2 Chains, 2SC into final chain. Working along the Back of the chain now, you should have 4 backs to work into. SC2 in the back of the first chain, SC1 in the back of the next 2 chains, SC2 in the back of the final chain. You should have 12 SC in an oval shape at this point, we move onto standard rounds. |
(12) |
|
2 |
(SC4, INC 2) x2 |
(16) |
|
3 |
(SC 5, INC, SC, INC) x2 |
(20) |
|
4 |
(SC 6, INC, SC 2, INC) x2 |
(24) |
|
5 – 6 |
SC in each stitch around |
(24) |
|
7 |
(SC 10, DEC) x2 |
(22) |
|
8 |
SC 6, DEC x4, SC8 |
(18) |
|
9 |
SC 5, DEC x3, SC 7 |
(15) |
|
10 |
SC 4, DEC, SC, DEC, SC 6 |
(13) |
|
11 - 14 |
SC in each stitch around |
(13) |
Don’t overstuff the leg! Stuff the foot until you’re happy with how firm it is, don’t overstuf the leg, particularly towards the top of the piece, or your bunny won’t sit.
Whip stitch the top of the leg closed and attach to the bottom of the body. The inside of the top of the leg in between rounds 1 and 2 of the body, centered and next to each other.
The Angling of the legs is up to you, I find the toys sit easier if you angle the outside edge of the legs further back than the inside to make a V with the legs.
You’ll find it easier to judge this after you’ve made the tail piece, pin both legs and the tail in place prior to attaching and test your bunny’s ability to sit first!


Tail
The Tail is completed using Eyelash yarn, or fluffy yarn of some kind - you may not be able to visually see your stitches using yarn like this. The tail piece does not have to be pefect, especially if you’re using fluffy yarn you’ll hardly notice imperfections.
If you opt to use normal acrylic instead, you can use a Pet “Slicker brush” on the finished piece to make it look fluffy if you like.
If you do use eyelash yarn, depending on your tension / style / the exact yarn you use you may find the wrong side is fluffier, this is such a small piece and it’s so hard to actually see the detail of the stitches I often attach the tail inside out so the fluffier side is on the outside - this is up to you entirely.
|
Row |
Instructions |
Final Stitch Count |
|
1 |
SC 6 into a Magic Ring |
(6) |
|
2 |
INC in each stitch around |
(12) |
|
3 |
(SC 1, INC) x 6 |
(18) |
|
4 |
(SC 1, INC, SC 1) x 6 |
(24) |
|
5 – 7 |
SC in each stitch around |
(24) |
|
8 |
(SC 1, DEC, SC 1) x 6 |
(18) |
Stuff and attach to the base of the body at the back.
The bottom of the tail typically sits between rows 4 - 5 to allow the bunny to sit, I’d reccomend pinning the tail and both legs in place prior to attaching any of them however, to test and make sure your little Bun sits the way you want him to first.
Attaching Everything
Rules for attaching things:
Pin first, always.
Don’t have pins? Use crochet or knitting needles as pins, your stitches have gaps in them no matter how tighly you crochet. Use Safety pins, stitch markers, chopsticks, toothpicks….
If you’re not sure you’ve pinned everything in the right spot, have someone stand further away from you holding it, or place it on a table and walk a couple meters away to look at it. Sometimes Distance is the perspective you need to notice that one arm is higher than the other etc
The direction of your needle should always go inside to the outside. Never pass the sewing thread from the outside in.
Try both ways! If you go from outside —> Inside, you’ll be able to see the thread on the outside of the work, by passing inside —> Outside you hide the bulk of it inside the toy.
Knot and wave every thread to lock it in place, even if it doesn’t look like it should be a super important one.
Photo instructions to come :(