
Help guide and FAQ
A place for questions to be answered. Got a question of your own? Ask away!
How to read the pattern layouts
Each individual part you need to make will have it’s own section.
For every separate piece a pattern needs you to make, there will be a separate section for it (ie. A section for thehead, the body, the arms, the legs etc.). In patterns such as the Chibi Dinosaur Desk buddy that has the head and body as one piece - that head/body piece will be it’s own section.
In patterns that have them separate, you should have clear headings for what part of the pattern you’re about to start on, and a clear ending for when you’re done with it.
Each set of instructions will have 3 pieces of information per row:
Row number
instructions
Stitch count once you’re finished with this row
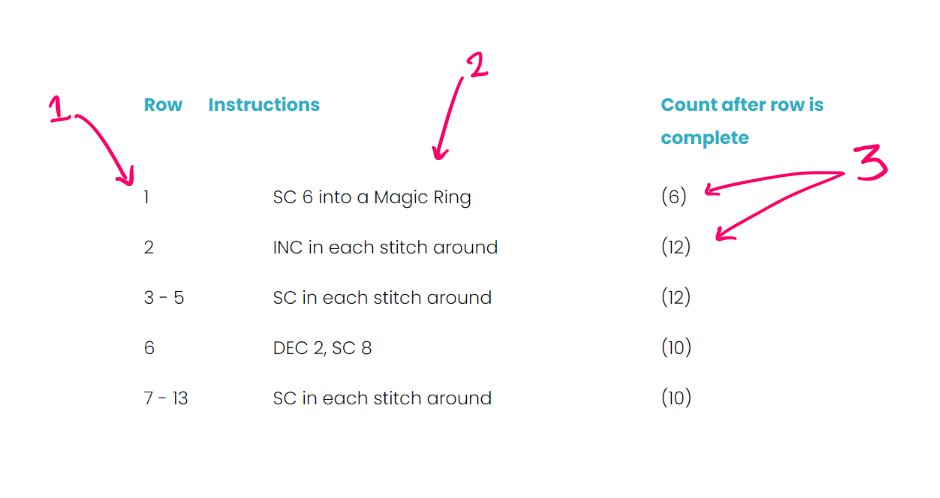
Why do I need all that information?
Not everyone will use all the information, but different people have different preferences so we try and include as much as we can to make understanding the pattern as easy as possible.
Row number helps you keep track of where you’re up to, especially if you’ve had to put the piece you’re working on down mid-completion
Count after is a good way of making sure you haven’t missed a stitch anywhere! Some people like to count after every row, if you want to ignore the count information please feel free :)
How do I read the instructions Column?
I use US terminology in a standard shorthand format that has become somewhat standard across the english-speaking internet, here’s a quick glossay of terms I’ve used to date:
** To come: UK vs US terminology
Ch —> Chain
SC —> Single Crochet
DC —> Double Crochet
HDC —> Half-double Crochet
TC —> Triple Crochet
INC —> Increase (Work 2 stitches into the same stitch to add one to the overall count)
DEC —> Decrease (crochet two stitches together to remove one from the overall count)
MR —> Magic Ring (Work stitches into a tight circle)
What does the rest of it mean?
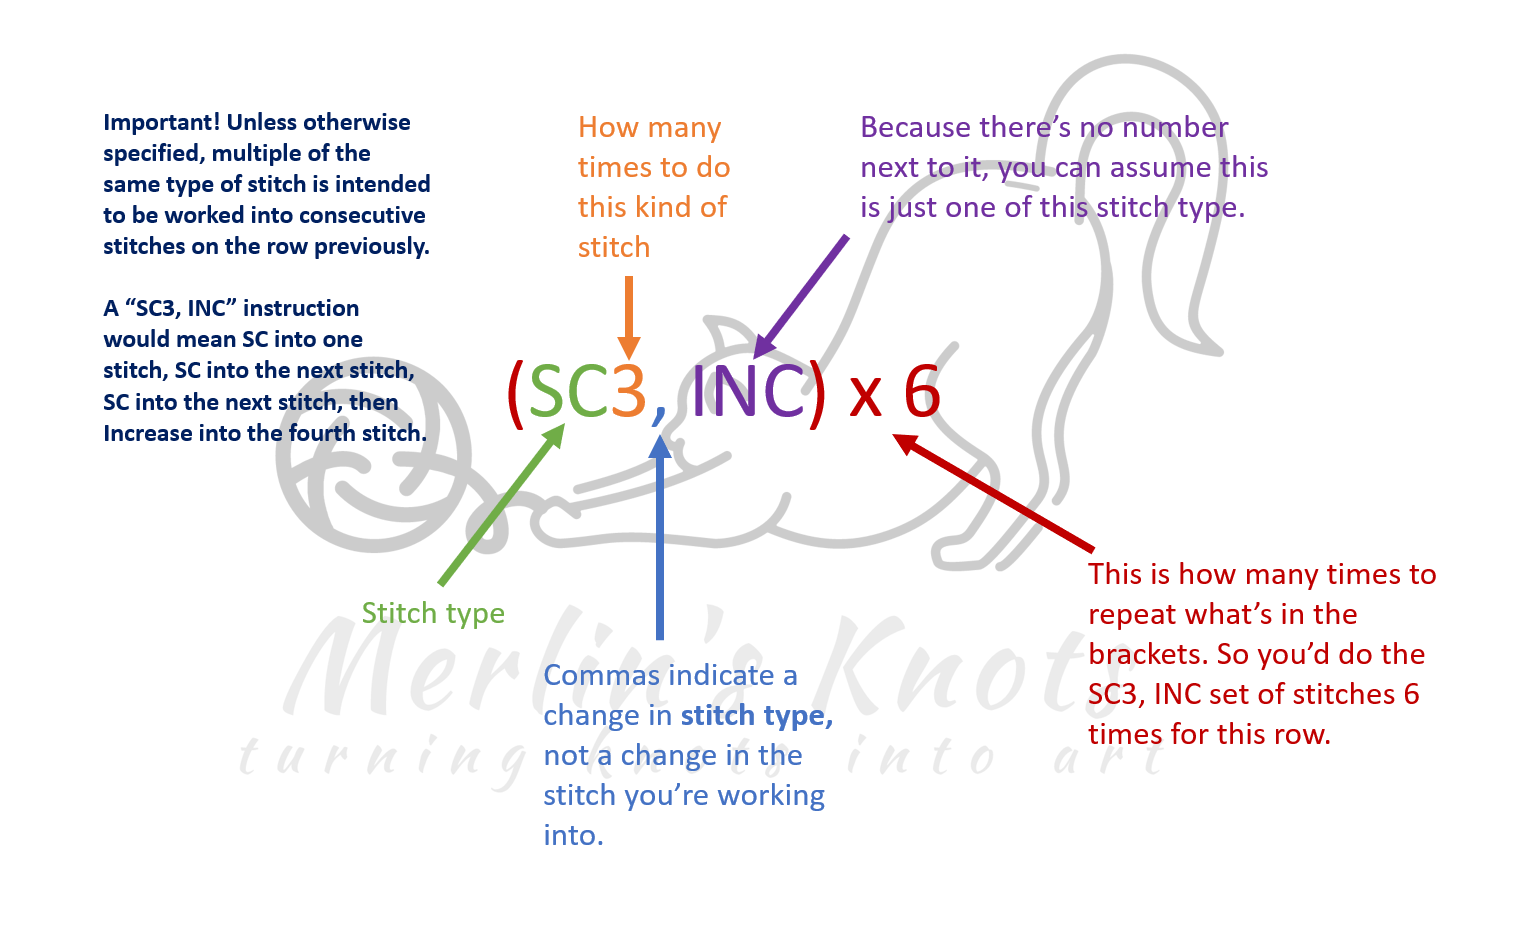

Why do the increases and decreases look the way they do?
When I’m writing instructions, the easiest way to write them would be like this right?
SC1, INC
SC2, INC
SC3, INC
SC4, INC
So why don’t I? A lot of artists don’t write them this way, instead our instructions look like this
SC1, INC
SC1, INC, SC1
SC3, INC
SC2, INC, SC2
They’re written like this to ensure you create a circular shape instead of having points on your work like a hexagon. If you increase at the same point on each round, the circle you’re making will bulge out in that point, like a hexagon when working in mulitples of 6.
By writing your patterns like the second example, you alternate where the increases are and it stays much more circular.
Where do I place Stitch Markers? Do I need them?
Stitch markers in my opinion are essential to making any crochet piece that works in the round. Otherwise It’s easy to lose track of where in the row you are.
Hypothetically could you just ensure you keep count? Of course.
Realistically I get distracted easily and forget where I’m up to, so a stitch marker is essential for me to work accurately.
I place my stitch marker at the end of each row; looped into the last stitch of each row.
You can choose to place it on the first stitch instead if you like, that one’s personal preference, whichever you find easiest.
But I don’t own stitch markers!
Confession: I don’t always use actual stitch markers - pretty much ever. Instead I tend to use:
Scrap Yarn
Bobby pins
Safety pins
Small hair clips one time when using the really chunky chenille yarn
Stitch markers are excellent but I personally tend to lose them an awful lot so don’t always use them, i default to using bits of scrap yarn looped through instead. As long as you don’t use Wool and use cotton or acrylic it shouldn’t catch into your actual work, and will just slide right out when you’re done.
Frequently Asked Questions - FAQs
-
In Australia yarn (often called “wool” here even when it’s acrylic / cotton) is weighted by something called ply.
Ply refers to the amount of layers in the yarn thread so 1 ply is very thin, 12ply is much thicker.
8 ply is another way of saying DK weight or Light Worsted in the US, typically numbered as weight “3”
-
Please go right ahead! Please credit me with the pattern if you do, and if you can please send me a photo of what you make! :)
-
A Magic Ring or a Magic Circle is a way to begin crocheting in the round by crocheting the first round into an adjstable loop that you can then pull tight.
If you’ve never done one of these before, the easiest way is below - instructions for a “Magic Ring 6”, if you want a different number, adjust how many SC you do into the ring in step 2:
Chain 3
SC 5 stitches into the first chain completed (3 from the hook)
Pull the tail, you should find it tightens right up
Secure the tail by weaving it through or knotting it (or both!)
There are innumerable ways of doing a magic ring, please feel free to use any method you like to start off my patterns