

Prove to me that Dinosaurs weren’t soft and fluffy, I’ll wait.
Tallulah the Triceratops Crochet Pattern
Before you start:
This pattern is completely written however is waiting on pictures of the step-by-step process, if you have any problems with the pattern please reach out and let me know and I’ll prioritise getting that step photographed!
While this dinosaur is generally made with chenille / velvey yarn and a larger hook, you can make this using standard acrylic yarn as well and a smaller hook.
I personally use very close to exactly 1 ball of himalaya dolphin baby in the base colour for this pattern, the first time you complete this pattern, consider ensuring you have 2 balls of the base colour to ensure you have enough to complete it.
The smaller dinosaurs are made with 8ply acrylic yarn; I personally use the Marvel brand from Spotlight stores in Australia
The larger soft dinosaur is made with Himalaya dolphin, and a 4.5mm hook.
A good alternative is Hobbii’s Honey Bunny yarn
Safety eyes are not suitable for small children as they may pose a choking hazard, if finished product is intended for a child please do not use safety eyes here and use one of the following insted:
Using 100% Mercerised cotton in 4ply & a 1.5mm hook (a 2 - 2.5mm hook will be fine here too depending on personal preference)
Crochet 8 HDC into a Magic Ring
Crochet 2 HDC into each stitch around (16 stitches)
You can use either SC or DC for either row depending on how big you want the eyes to be. I personally like to then loop some white through some stitches to make highlights, but this is personal preference.
Felt and/or felting on eyes using a felting tool
The indent on the eyes is created by looping scrap acyrlic yarn around them and pulling inwards, this step will be detailed below but is entirely optional.
A Glossary of Terms:
Pattern is written in US Terminology unless otherwise specified
Ch —> Chain
Slst —> Slip Stitch
SC —> Single Crochet
HDC —> Half-double Crochet
DC —> Double Crochet
TC —> Triple Crochet
INC —> Increase (Work 2 stitches into the same stitch to add one to the overall count)
DEC —> Decrease (crochet two stitches together to remove one fro the overall count)
MR —> Magic Ring (Work stitches into a tight circle)
This pattern is worked in the round, this means please don’t slip stitch at the end of the row to join, continue on in a spiral.


You will need:
4.5 mm crochet hook
Yarn needle
Himalaya dolphin baby - 1 entire ball in base colour, scraps in secondary colour.
15 - 18 mm safety eyes
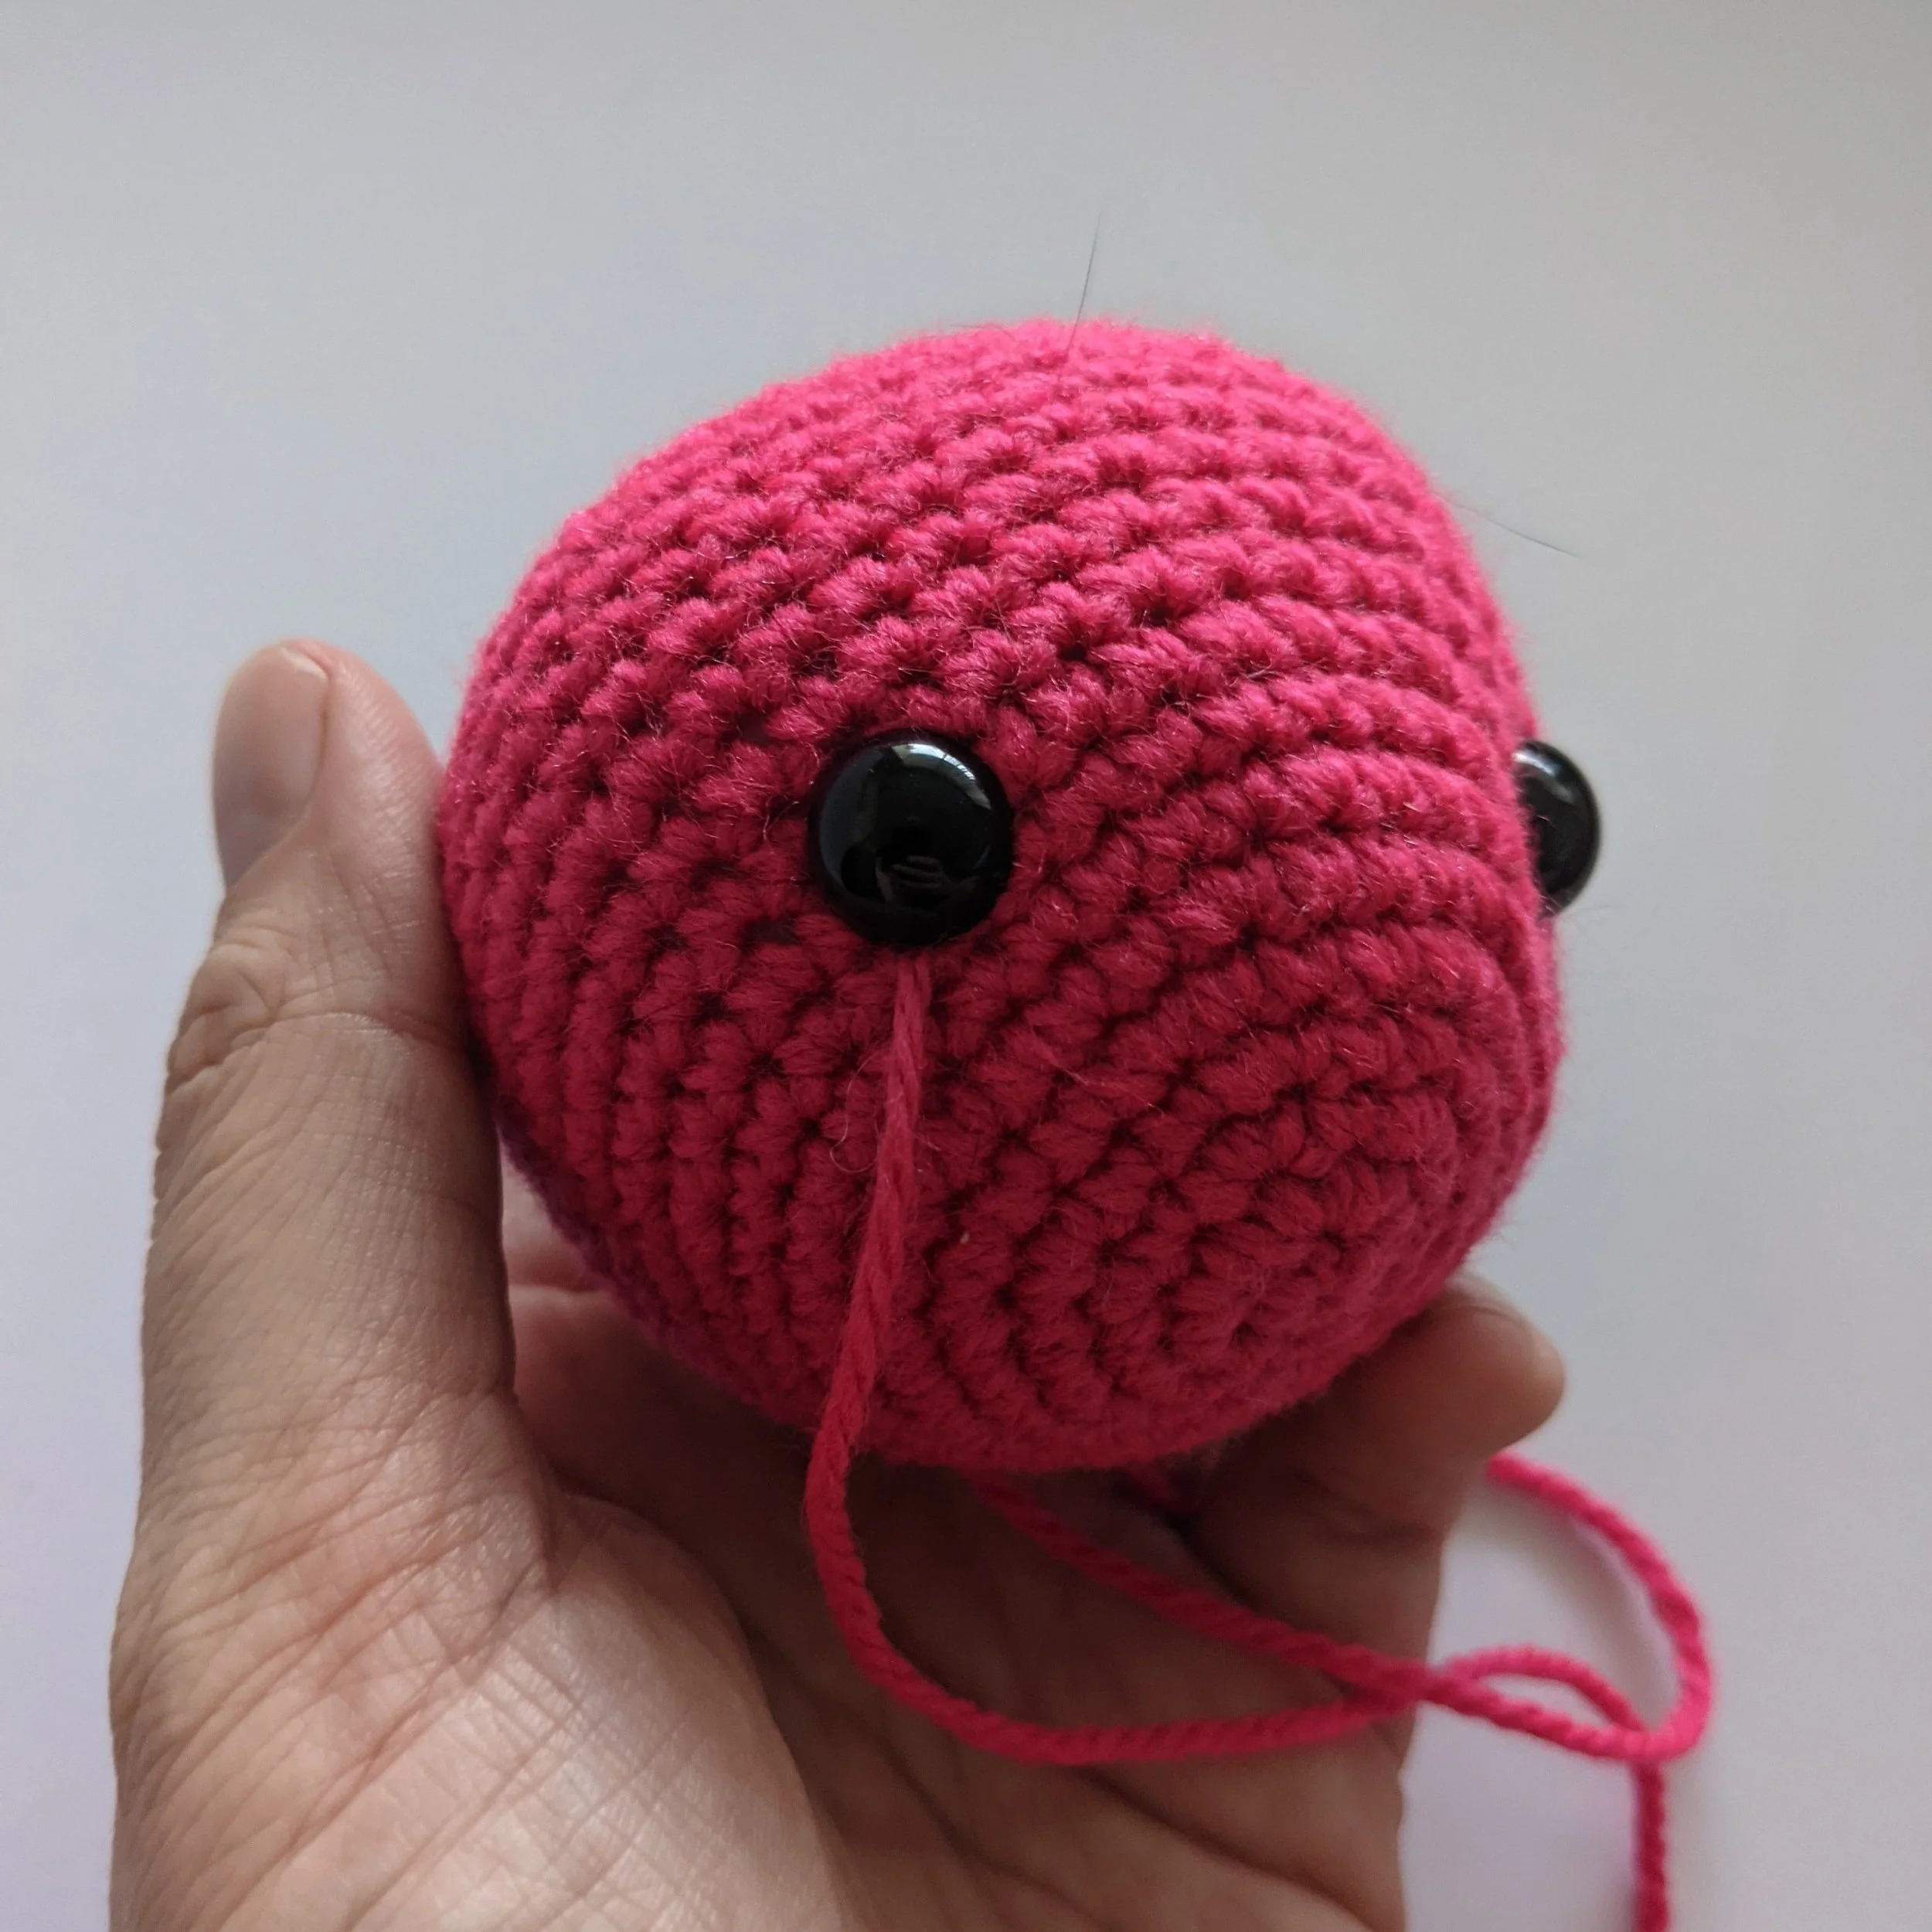
Head
Worked front to back
Attach the eyes in between rows 9 and 10 before closing off, approx 11-12 stitches apart.
|
Row |
Instructions |
Final stitch count |
|
1 |
Magic Ring 6 |
(6) |
|
2 |
INC Around |
(12) |
|
3 |
(SC1, INC) x6 |
(18) |
|
4 |
(SC1, INC, SC1) x6 |
(24) |
|
5 |
(SC3, INC) x6 |
(30) |
|
6 |
(SC2, INC, SC2) x6 |
(36) |
|
7 - 8 |
SC in each stitch around |
(36) |
|
9 |
(SC5, INC) x6 |
(42) |
|
10 - 11 |
SC in each stitch around |
(42) |
|
12 |
(SC3, INC, SC3) x6 |
(48) |
|
13 - 17 |
SC in each stitch around |
(48) |
|
18 |
(SC3, DEC, SC3) x6 |
(42) |
|
19 |
(SC5, DEC) x6 |
(36) |
|
20 |
(SC2, DEC, SC2) x6 |
(30) |
|
21 |
(SC3, DEC) x6 |
(24) |
|
22 |
(SC1, DEC, SC1) x6 |
(18) |
|
23 |
(SC1, DEC) x6 |
(12) |
|
24 |
DEC Around |
(6) |

Indenting the Eyes
On your finished head piece, take another long piece of yarn - if you used the himalaya dolphin baby yarn, ideally you want to use an acrylic yarn in a similar colour for this, the himalaya may snap if you use it. Colour match is not important, if you don’t have a close one use whatever you’d like for this - the himalaya brown rabbit I used pumpkin coloured thread, there’s an image down the bottom of the section, you shouldn’t be able to see the thread at all when you’re done.
Attach thread to your yarn needle and pass the yarn through the stitch closest to the eye on the inside bottom corner, through to the opposite eyes bottom inside corner.
Pull thread through until you have even tails on either side

4. Make a loop with the tail and loop around the eye twice, pull loop tight so you cannot see the loop anymore on the eye and have the tail back where it started in the bottom inside corner - do this on both eyes.
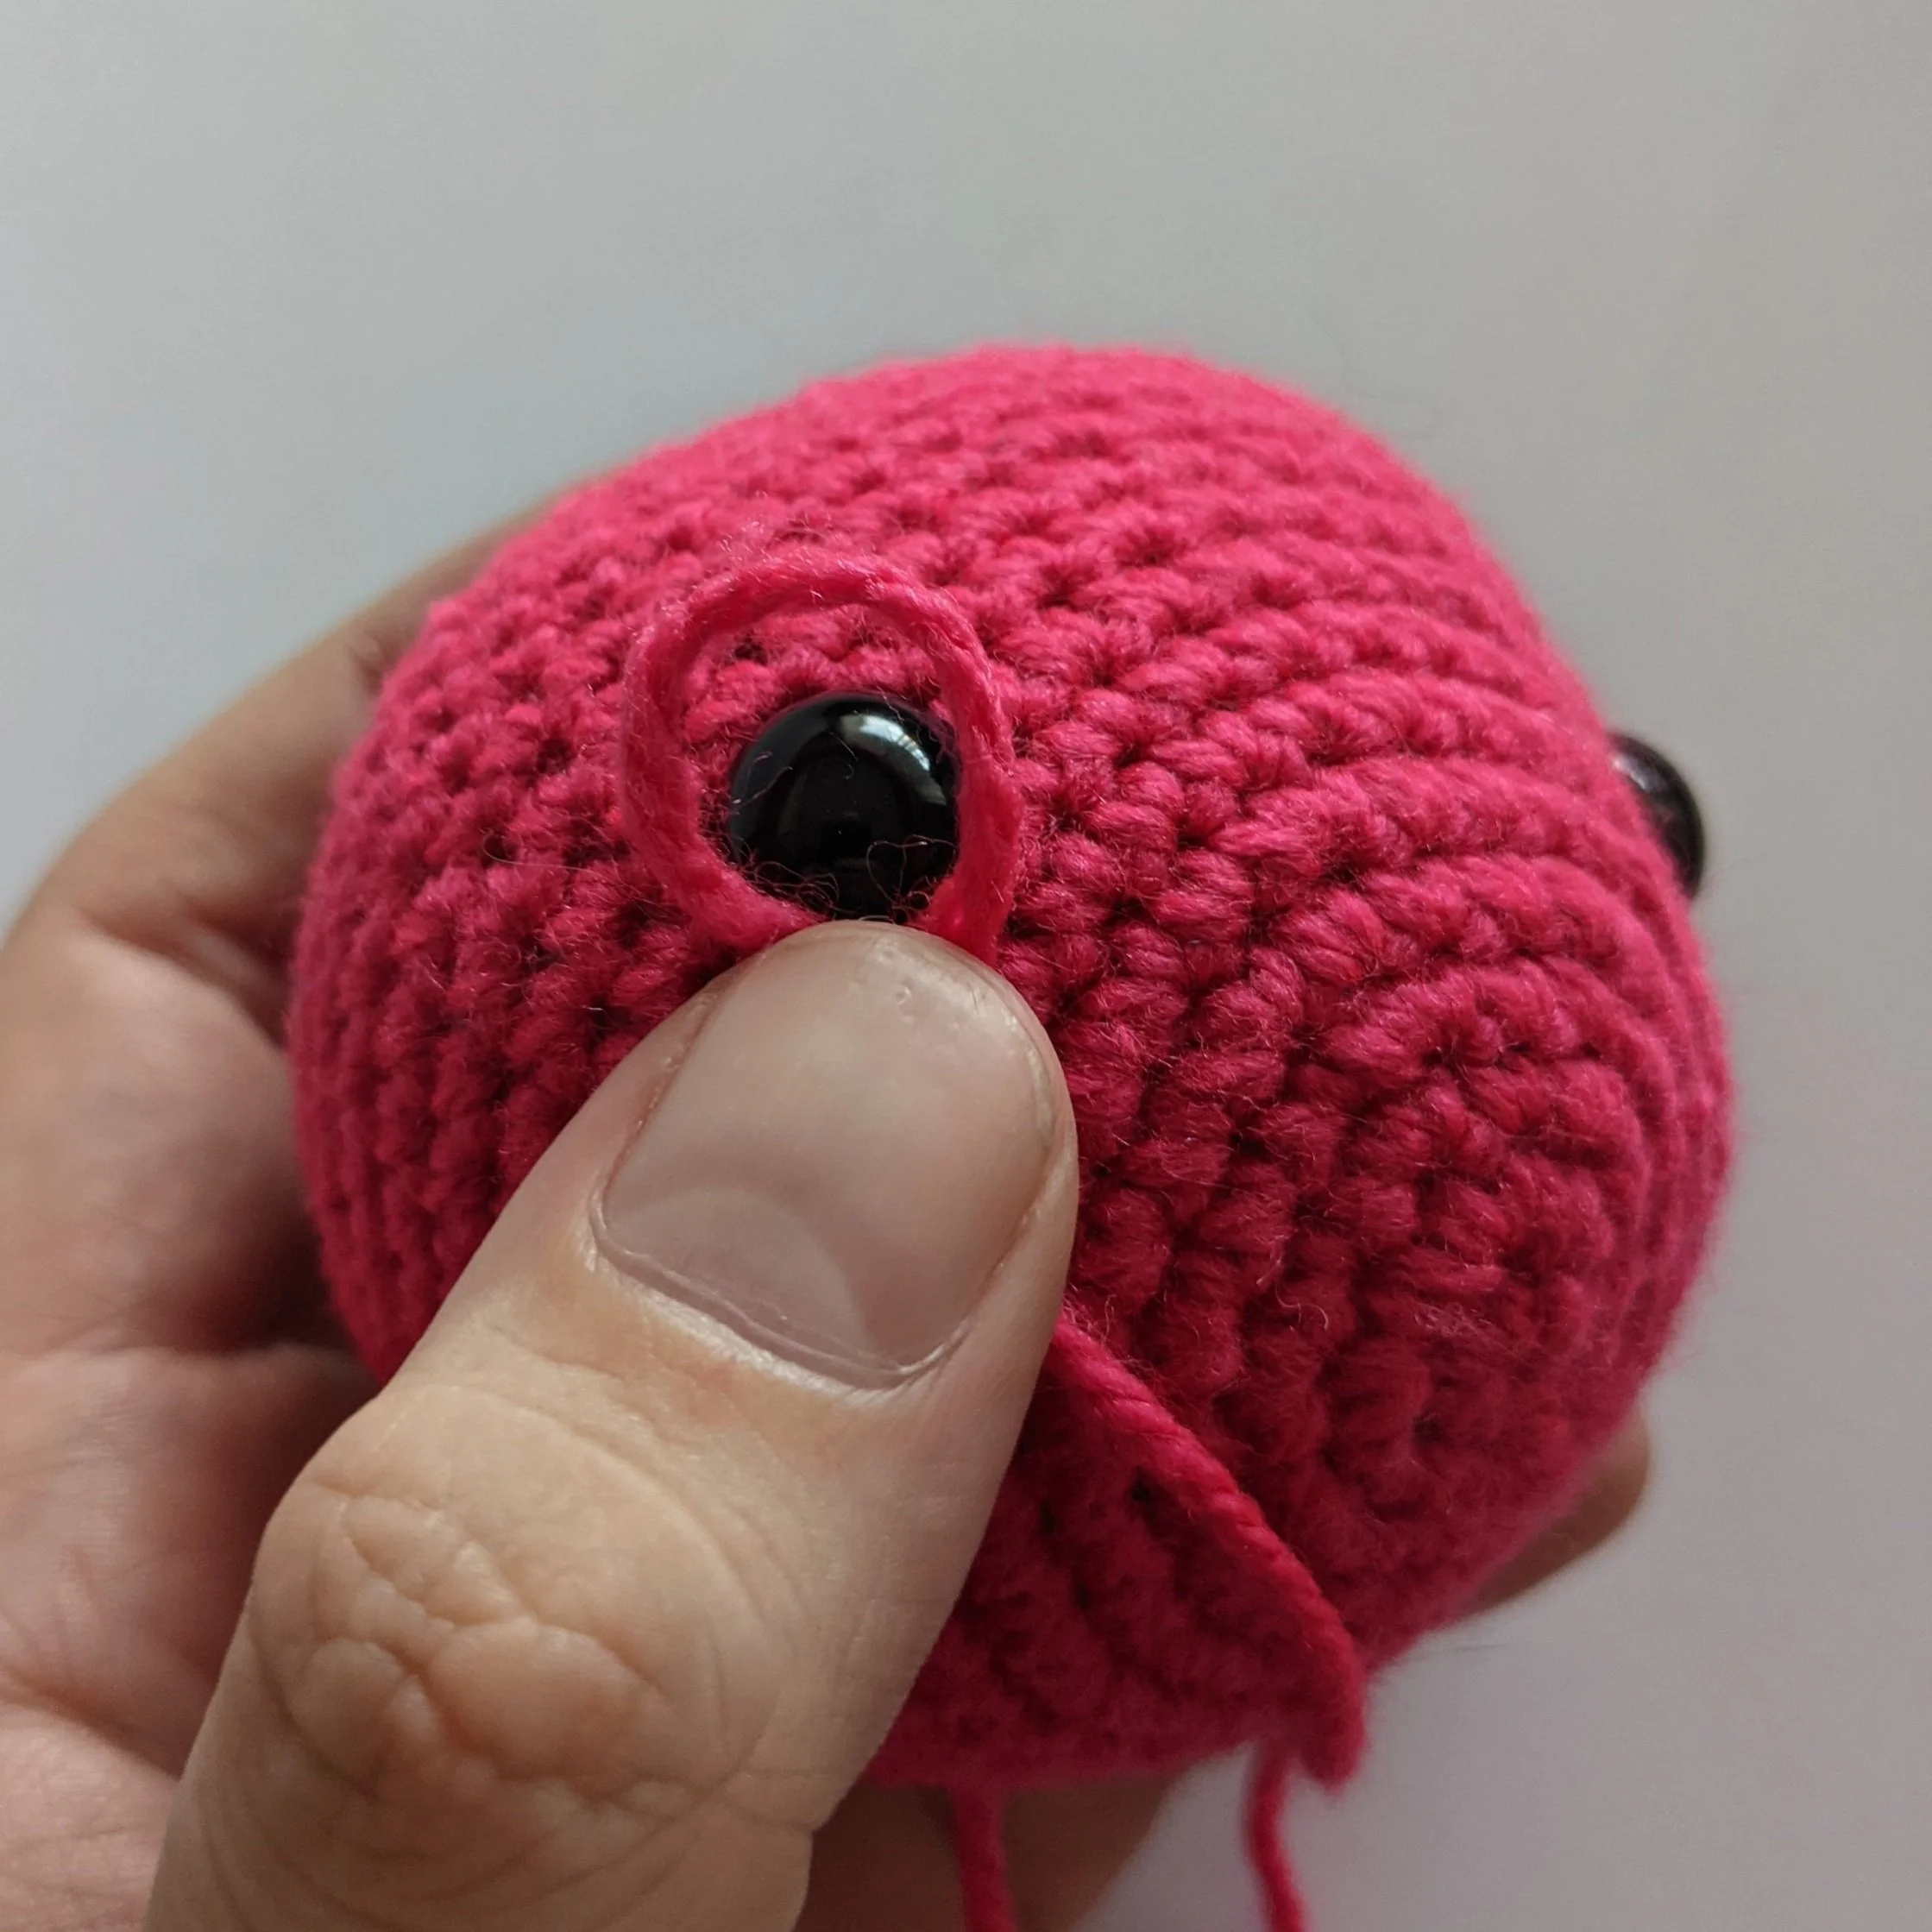

7. Take the two tails, and pull them tightly until the eyes are indented to where you want them.
8. Knot the ends over at least one stitch to anchor them in place, ensure you don’t use a granny knot here or it will slowly slip out.
9. Leave the tails free, you can stuff them into the body when it’s completed and attached, you may want to weave the ends into some of the stitches on the bottom of the head that will be covered by the body if this toy is expected to be thrown around a fair bit to secure them a little more.


5. Pass thread now back through the stitch closest to the bottom inside of the eye, but this time draw the thread down to the bottom center of the head piece - this part of the head will be covered by the body.
6. Ensure when you do the other eye you pass the thread through to the adjacent stitch, you will need the tails in different close stitches to each other to anchor them, otherwise when you pull the threads they won’t stay where you pull.

Body
|
Row |
Instructions |
Final stitch count |
|
1 |
Magic Ring 6 |
(6) |
|
2 |
INC Around |
(12) |
|
3 |
(SC1, INC) x6 |
(18) |
|
4 |
(SC1, INC, SC1) x6 |
(24) |
|
5 |
(SC3, INC) x6 |
(30) |
|
6 |
(SC2, INC, SC2) x6 |
(36) |
|
7 |
(SC5, INC) x6 |
(42) |
|
8 - 11 |
SC Around |
(42) |
|
12 |
(SC5, DEC) x6 |
(36) |
|
13 |
SC Around |
(36) |
|
14 |
(SC5, DEC, SC5) x6 |
(33) |
|
15 |
SC Around |
(33) |
|
16 |
(SC9, DEC) x3 |
(30) |
|
17 |
SC Around |
(30) |
|
18 |
(SC3, DEC) x6 |
(24) |
|
19 |
SC Around |
(24) |
|
20 |
(SC1, DEC, SC1) x6 |
(18) |
|
21 - 24 |
SC Around |
Tail
|
Row |
Instructions |
Final stitch count |
|
1 |
Magic Ring 4 |
(4) |
|
2 |
(SC1, INC) x2 |
(6) |
|
3 |
SC Around |
(6) |
|
4 |
SC1, INC, SC2, INC, SC1 |
(8) |
|
5 |
SC Around |
(8) |
|
6 |
(SC1, INC) x4 |
(12) |
|
7 |
SC Around |
(12) |
|
8 |
(SC3, INC) x3 |
(15) |
|
9 |
SC Around |
(15) |
|
10 |
SC2, (INC, SC4) x2, INC, SC2 |
(18) |
|
11 |
(SC5, INC) x3 |
(21) |
Arms (Make Two)
|
Row |
Instructions |
Final stitch count |
|
1 |
Magic Ring 6 |
(6) |
|
2 |
INC Around |
(12) |
|
3 – 5 |
SC Around |
(12) |
|
6 |
DEC x2, SC8 |
(10) |
|
7 - 14 |
SC Around |
(10) |
Legs (Make 2)
The legs are worked in a round that is started from a chain, this is done by crocheting along the chain as you normally would, and then going around and crocheting along the back of the chain as well to create an oval shape instead of the circle you’d usually start with.
This is done to create a longer foot - if you’re not comfortable doing this and don’t mind a rounder foot, you can instead subsitite round 1 for a MR6, then INC in each stitch around to create your own 12start.
|
Row |
Instructions |
Final stitch count |
|
1 |
Chain 5, 2SC in second chain from hook, SC1 in next 2 Chains, 2SC in final chain.
Working along the
Back of the chain now, you should have 4 backs to work
into.
|
(12) |
|
2 |
(SC4, INC2) x2 |
(16) |
|
3 |
(SC5, INC, SC, INC) x2 |
(20) |
|
4 |
(SC6, INC, SC2, INC) x2 |
(24) |
|
5- 6 |
SC Around |
(24) |
|
7 |
(SC10, DEC) x2 |
(22) |
|
8 |
SC6, DEC x4, SC8 |
(18) |
|
9 |
SC5, DEC x3, SC7 |
(15) |
|
10 |
SC4, DEC, SC, DEC, SC6 |
(13) |
|
11 - 14 |
SC Around |
(13) |


Nose Horn
|
Row |
Instructions |
Final Stitch Count |
|
1 |
SC4 into a Magic Ring |
(4) |
|
2 |
(SC, INC) x2 |
(6) |
|
3-4 |
Slst 2, SC4 |
(6) |
Top Horns (make 2)
|
Row |
Instructions |
Final Stitch Count |
|
1 |
SC4 into a Magic Ring |
(4) |
|
2 |
(SC, INC) x2 |
(6) |
|
3 |
SC in each stitch around |
(6) |
Back Spots - Optional
(3 unique)
Spot #1
|
Row |
Instructions |
Final Stitch Count |
|
1 |
SC 6 into a Magic Ring |
(6) |
Spot #2
|
Row |
Instructions |
Final Stitch Count |
|
1 |
SC 4 into a Magic Ring |
(4) |
|
2 |
INC in each stitch around |
(8) |
Spot #3
|
Row |
Instructions |
Final Stitch Count |
|
1 |
SC 6 into a Magic Ring |
(6) |
|
2 |
INC in each stitch around |
(12) |
Collar
|
Row |
Instructions |
Final Stitch Count |
|
1 |
Begin in Colour A.
Chain 71.
|
(70) |
|
2 |
(SC2, INC, SC, INC, SC2) x5 Change to Colour B. Note! Don't cut the tail from Colour A, you can pick it straight back up without having a tail to weave in later. (SC2, INC, SC, INC, SC2) x5
Chain 1 and turn. |
(90) |
|
3 |
(SC, HDC2, DC-INC, TC, DC-INC, HDC2, SC) x5 Change back to colour A (SC, HDC2, DC-INC, TC, DC-INC, HDC2, SC) x5
|
(110) |

|
4 |
Fold collar in half lengthways, the fold should be along the colour change so Colour B is on the front and the Back is entirely in Colour A. |
(55) |


|
4 (continued) |
In Colour A, Chain 1 and turn. Pinch Collar together and SC through both stitches on the front and back of the collar at once to form the top. Ch1 & turn, SC 55 Leave a long tail for sewing. |
(55) |

It should now look like this when it’s done:

On your collar, the repeats you’ve been doing have formed five (5) peaks and four (4) valleys. To complete the collar we’re going to run a thread across each of the four valleys.
Take your long tail and thread it onto a yarn needle (One of the ones with a blunted end, sometimes called a tapestry or darning needle)
Take that needle and bring it through the inside of your collar to come out at the time of the first valley like so:


Pull thread all the way through and then re-enter below the white (colour B) portion

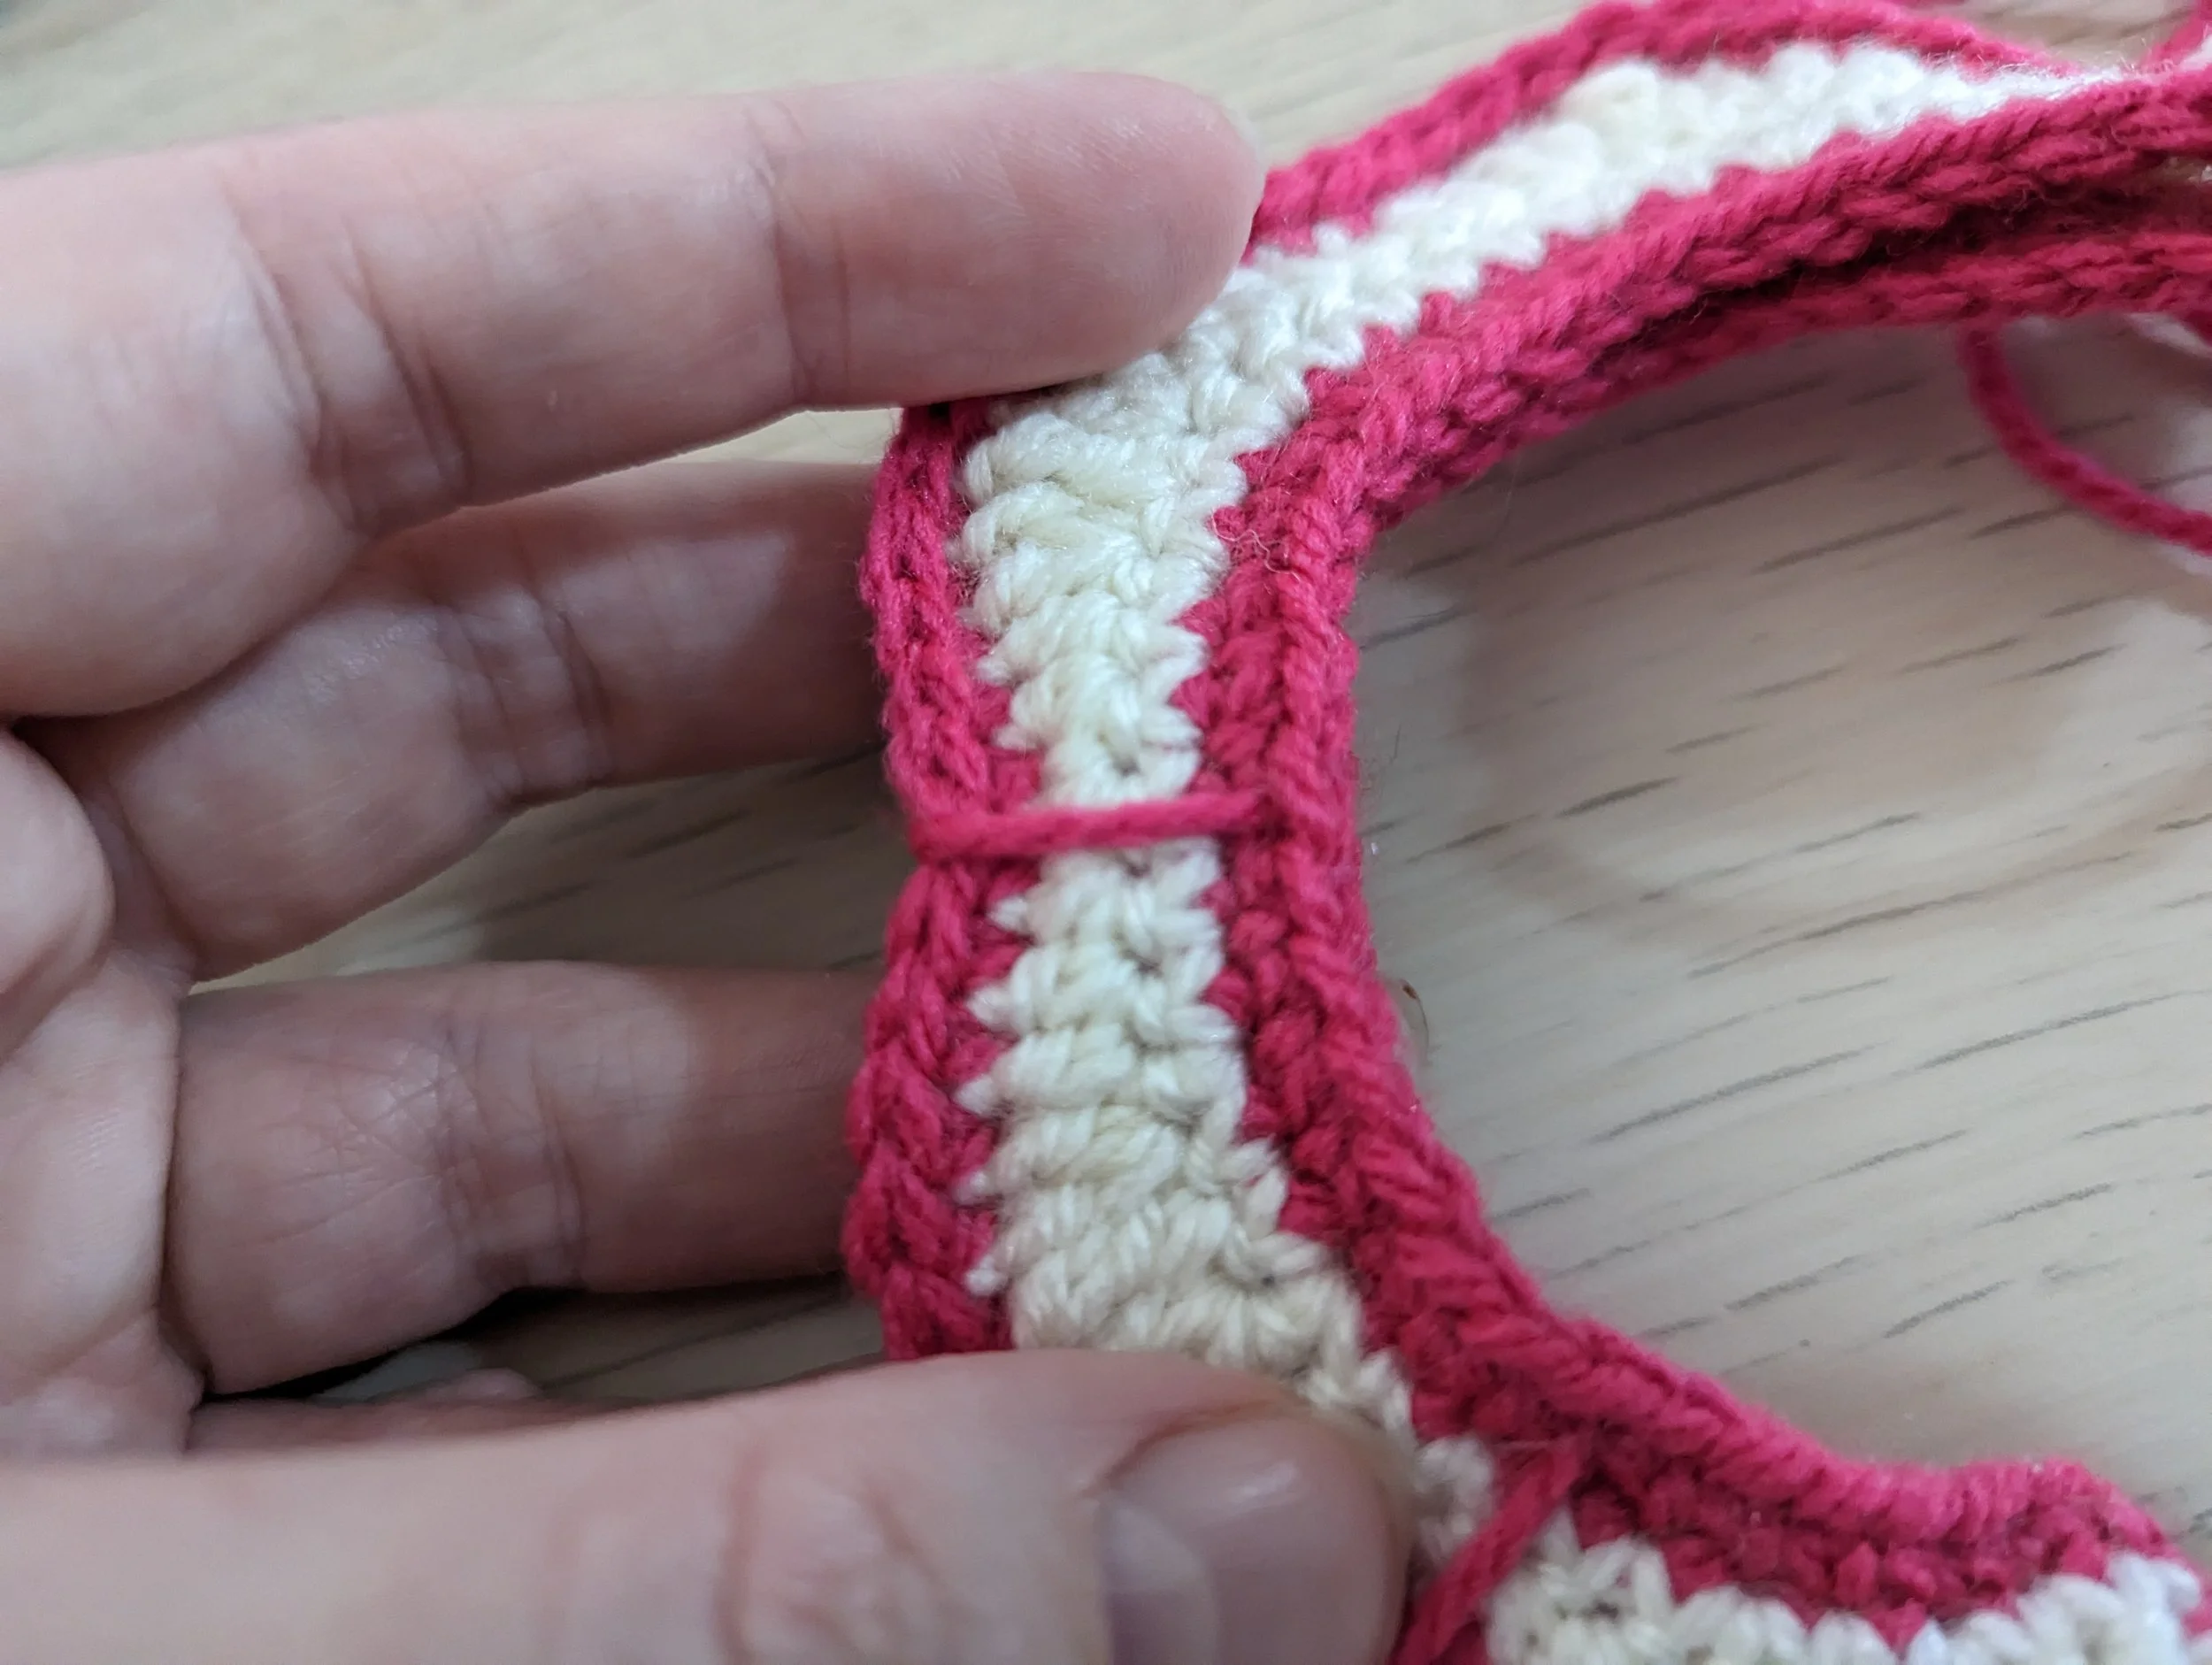
Repeat for each valley.
When you get to the end, use your tail to whip stitch the otehr short side closed, leave the tail, you’ll need it to attach the collar to the head.
Do not whip stitch the bottom of the collar closed, it’s attached to the head open to create the correct shape.


Attaching Everything
Rules for attaching things:
Pin first, always.
Don’t have pins? Use crochet or knitting needles as pins, your stitches have gaps in them no matter how tighly you crochet. Use Safety pins, stitch markers, chopsticks, toothpicks….
If you’re not sure you’ve pinned everything in the right spot, have someone stand further away from you holding it, or place it on a table and walk a couple meters away to look at it. Sometimes Distance is the perspective you need to notice that one arm is higher than the other etc
The direction of your needle should always go inside to the outside. Never pass the sewing thread from the outside in.
Try both ways! If you go from outside —> Inside, you’ll be able to see the thread on the outside of the work, by passing inside —> Outside you hide the bulk of it inside the toy.
Knot and wave every thread to lock it in place, even if it doesn’t look like it should be a super important one.
If you’re using Chenille yarn, you’ll find plastic yarn needles shred the yarn a lot less, metal yarn needles tend to shred it a bit, and the yarn can be hard to attach with.
If needs be, a closely coloured acrylic/cotton will attach just fine, you can generally hardly see the attaching yarn.
Photo instructions to come :( See below visual examples for now.
Note the incredibly wonky leg placement here - don’t stress if you attach a piece a bit wonky, odds are unless you’re looking closely, you won’t neccessarily be able to tell.


